Quick Start
m (Housekeeping) |
m |
||
| Line 3: | Line 3: | ||
-- Needs to be update for newer versions. | -- Needs to be update for newer versions. | ||
| − | <br>[[Image:Setup1.jpg|thumb|left|512px]] [[Image:Setup2.jpg|thumb|left|512px| | + | <br>[[Image:Setup1.jpg|thumb|left|512px|Setup Vera UI2]] [[Image:Setup2.jpg|thumb|left|512px|Setup Vera UI2]] |
== Setting up Vera == | == Setting up Vera == | ||
| Line 35: | Line 35: | ||
Also, once you complete the setup page, then you won't see the setup page when you access Vera. Instead, you will see the [[Dashboard|Dashboard]]. If you want to change your setup later, just click the 'Setup' button on the dashboard to get back to this setup page, jump directly to the setup step you want to change, make your changes, and click 'Save'. | Also, once you complete the setup page, then you won't see the setup page when you access Vera. Instead, you will see the [[Dashboard|Dashboard]]. If you want to change your setup later, just click the 'Setup' button on the dashboard to get back to this setup page, jump directly to the setup step you want to change, make your changes, and click 'Save'. | ||
| − | [[Image:Dashboard1.jpg|thumb|left|512px | + | [[Image:Dashboard1.jpg|thumb|left|512px]] |
[[Category:User_Instructions]] [[Category:UI2]] | [[Category:User_Instructions]] [[Category:UI2]] | ||
Revision as of 23:10, 23 December 2011
The Quick Start Guide that comes in Vera's box explains how to physically connect Vera and get to Vera's setup site in your web browser. If you've already done this (including inserting Vera 1's black Z-Wave dongle) confirming Vera's power light is on solid, and you see the Vera's setup site in your web browser, continue to setup Vera as explained below. If not, click here.
-- Needs to be update for newer versions.
Setting up Vera
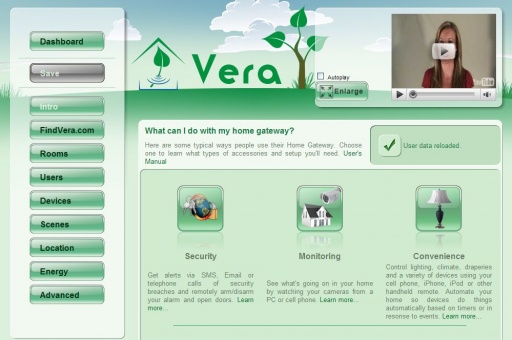
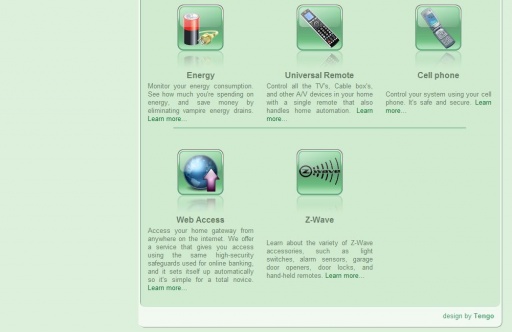
Vera's setup page is shown at left. You only need to use the setup page when you first setup Vera, or if you want to make changes later on. Once Vera is setup, you will see the Dashboard page instead, but you can always return to the setup page by clicking the "Setup" button.
Technically, the only two steps that are required are 'Rooms' and 'Devices'. You can be up and running in just a couple minutes. However, to get the full benefit of Vera we recommend you go through all 9 steps in order. Note that once you have made changes you will see this red 'Save' button. Your changes are not saved until you click it.
The 9 steps are:
Intro This explains the basic things Vera can do for you and shows you what accessories you'll need.
FindVera.com This explains the FindVera.com service and lets you pick a username and password for that service.
Rooms Here you list the rooms in your house.
Users Add all the people in your home who will be able to use the system and who you want to be notified of events, like a security breach or a sensor being tripped. Also tell Vera how to notify each user, such as with Email or SMS text.
Devices Here you add the devices you want to control, like Z-Wave lamp modules and IP cameras.
Scenes You can create scenes, which are really just a set of actions for your devices. For example, the "Go to Work" scene may turn off all the lights and the thermostat. This way you can press just one button, "Go to Work", to control a lot of devices at once. You can also add timers and events to make scenes happen at certain intervals, or in response to events such a motion detector being tripped or the sun going down.
Location If you tell Vera where you live, then Vera can set the time and calculate sunrise and sunset for that location. This is needed if you want to add timers and events to your scenes that are based on sun rise, sun set, and so on.
Energy Tell Vera to notify you if you forgot to turn the lights off after you left for work, or if energy usage is higher than it should be. Also, tell Vera how to handle an energy alert from your local government or utility, such as the Flex Alert in California.
Advanced Most people don't need to use this. It has advanced settings, such as manually configuring your network settings.
Note: Don't forget to click the 'Save' button to save your changes. If you close your web browser without clicking 'Save', your changes will be lost.
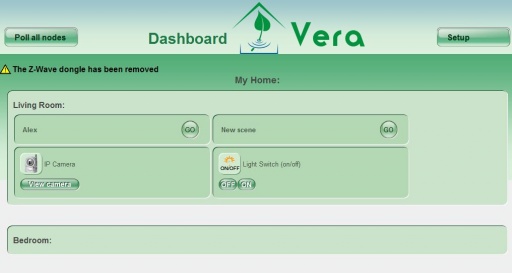
Also, once you complete the setup page, then you won't see the setup page when you access Vera. Instead, you will see the Dashboard. If you want to change your setup later, just click the 'Setup' button on the dashboard to get back to this setup page, jump directly to the setup step you want to change, make your changes, and click 'Save'.


