ZWave Options
Micasaverde (Talk | contribs) |
m |
||
| (6 intermediate revisions by 3 users not shown) | |||
| Line 1: | Line 1: | ||
| − | + | [[Category:User Instructions]] | |
| + | [[Category:UI2]] | ||
| + | [[Image:Z-wave Optionn.jpg|thumb|center|512px|Z-Wave Options]] | ||
| − | + | Here you have various advanced Z-Wave options. Use these options only if you understand what they mean. Most users will not need these options. | |
| − | + | '''Reset Z-Wave network''' purges all data in Vera's black Z-Wave dongle, which also clears out the list of Z-Wave devices paired to Vera. You will then need to [[Reset Node|reset any devices]] you previously paired, and pair them again. If you also want to get rid of your scenes, network settings, users, network devices, etc., you can do a full [[Factory Reset|factory reset]]. | |
| − | + | '''WARNING''': This process is '''IRREVERSIBLE''', you cannot restore your devices from a backup, you have to pair each of them again. | |
| + | Before proceeding you have to manually unpair all the devices, otherwise you will create duplicate nodes which will compromise your Z-Wave network. | ||
| − | Controller shift tells Vera to transfer the role of primary controller to another | + | |
| + | If you already have another Z-Wave controller that you want to be the master, and you want Vera to be the secondary controller, bring the master controller and Vera close to each other, tell the current master controller to start sending network data or to add another Z-Wave controller, and then click '''Copy Z-Wave network from a master controller'''. You will see the status of the transfer in blue at the top of the page, and Vera will tell you if it was successful. The "Role" shown on this page will then also change a minute or so later. | ||
| + | |||
| + | Rather than carrying around the dongle and using the dongle's built-in include/exclude, you can manually include/exclude devices by setting your options and clicking '''Go'''. Excluding a device is the same thing as resetting it, as explained [[Reset Node|here]]. Also read how to use this to do [[Full Power Inclusion|full power inclusion]] to add, or pair, Z-Wave devices to Vera without bringing the device in proximity to Vera's ZWave dongle. | ||
| + | |||
| + | '''Controller shift''' tells Vera to transfer the role of primary controller to another Z-Wave controller. After you click 'Controller Shift,' proceed to add the other Z-Wave controller the same way you normally would, as explained [[ZWave Add Controller|here]]. The difference between adding the controller by clicking 'Controller Shift' versus adding the controller the normal way by clicking 'Add ZWave controller', is that if you choose 'Controller Shift', at the end when the other Z-Wave controller gets added, that other ZWave controller will become the 'Master controller', and Vera will be a secondary controller. This means the other Z-Wave controller will then be responsible for healing the networking and being the SIS/SUC (a technical Z-Wave term). Normally, by default, Vera is the master controller and is SIS/SUC. | ||
Latest revision as of 21:44, 17 April 2010
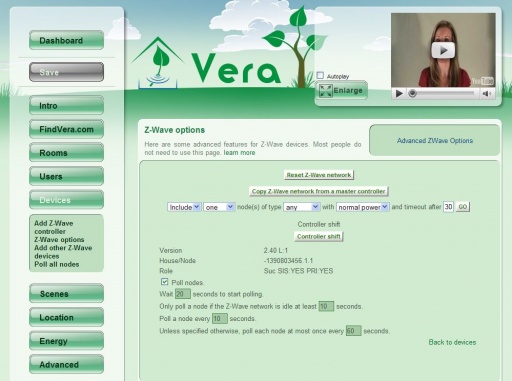
Here you have various advanced Z-Wave options. Use these options only if you understand what they mean. Most users will not need these options.
Reset Z-Wave network purges all data in Vera's black Z-Wave dongle, which also clears out the list of Z-Wave devices paired to Vera. You will then need to reset any devices you previously paired, and pair them again. If you also want to get rid of your scenes, network settings, users, network devices, etc., you can do a full factory reset.
WARNING: This process is IRREVERSIBLE, you cannot restore your devices from a backup, you have to pair each of them again. Before proceeding you have to manually unpair all the devices, otherwise you will create duplicate nodes which will compromise your Z-Wave network.
If you already have another Z-Wave controller that you want to be the master, and you want Vera to be the secondary controller, bring the master controller and Vera close to each other, tell the current master controller to start sending network data or to add another Z-Wave controller, and then click Copy Z-Wave network from a master controller. You will see the status of the transfer in blue at the top of the page, and Vera will tell you if it was successful. The "Role" shown on this page will then also change a minute or so later.
Rather than carrying around the dongle and using the dongle's built-in include/exclude, you can manually include/exclude devices by setting your options and clicking Go. Excluding a device is the same thing as resetting it, as explained here. Also read how to use this to do full power inclusion to add, or pair, Z-Wave devices to Vera without bringing the device in proximity to Vera's ZWave dongle.
Controller shift tells Vera to transfer the role of primary controller to another Z-Wave controller. After you click 'Controller Shift,' proceed to add the other Z-Wave controller the same way you normally would, as explained here. The difference between adding the controller by clicking 'Controller Shift' versus adding the controller the normal way by clicking 'Add ZWave controller', is that if you choose 'Controller Shift', at the end when the other Z-Wave controller gets added, that other ZWave controller will become the 'Master controller', and Vera will be a secondary controller. This means the other Z-Wave controller will then be responsible for healing the networking and being the SIS/SUC (a technical Z-Wave term). Normally, by default, Vera is the master controller and is SIS/SUC.
