Devices
Micasaverde (Talk | contribs) |
m |
||
| (9 intermediate revisions by 2 users not shown) | |||
| Line 1: | Line 1: | ||
| − | [[Image:Logo-zwave.jpg|left]] | + | [[Category:User Instructions]] |
| + | [[Category:UI2]] | ||
| + | [[Image:Logo-zwave.jpg|left]]Vera's "Devices" page shows you all the devices in your home, lets you control them, configure them, and add new devices. Vera supports a variety of [[Intro Z Wave|Z-Wave devices]], such as light switches, lamp modules, motion detectors, door locks, and so on. Mi Casa Verde sells a variety of Z-Wave devices online, or you can look for the Z-Wave logo on products you buy elsewhere. Generally Vera will work fine with any Z-Wave device that bears the Z-Wave logo shown to the left. Visit [[Supported Hardware|Supported Hardware]] to see an up-to-date list of the devices Vera is known to work with as well as notes about any special setup instructions for particular devices. | ||
| − | Vera also supports network devices, like security cameras | + | Vera also supports network devices, like security cameras, which can connect to your home's network either using a normal network cable, or wirelessly using Vera's built-in Wi-Fi network. If you buy wireless networking products from Mi Casa Verde, they will be pre-configured so that they automatically connect to your Vera's wireless network. Just take them out of the box and plug them in. If you buy your wireless networking devices elsewhere, they will need the network name and password of Vera's Wi-Fi network. This information is printed on the bottom of Vera and on the Quick Start Guide. (See [[Supported Hardware|Supported Hardware]] for more info.) |
| − | == Adding devices == | + | == Adding devices == |
| − | [[Image:44Devices.JPG|thumb | + | [[Image:44Devices.JPG|thumb|left|512px|4 types of devices]] The first time you click the 'Devices' button, if you haven't yet added any Z-Wave devices, Vera will give you 4 choices for setting up your Z-Wave devices, as shown to the left. If you won't be adding any Z-Wave devices right now, choose option #1. You can always come back and add them later. Otherwise, most users choose option #2. The other 2 options are for users who already have a Z-Wave network setup. You can also click [[ZWave Options|'Z-Wave options']] if you're an advanced Z-Wave user and want more advanced options. |
| − | Vera will show you step by step how to add Z-Wave devices by walking around with Vera's Z-Wave dongle. | + | Vera will show you step-by-step how to add Z-Wave devices by walking around with Vera's Z-Wave dongle. You don't need to add all your Z-Wave devices at once. You can come back to 'Devices' anytime and click 'Add Z-Wave Controller' to add a Z-Wave handheld controller, or click 'Add Other Z-Wave Devices' to add any other type of Z-Wave device like a lamp module or motion sensor. |
| − | In general, you don't need to tell Vera that you want to add a network device, like a security camera. | + | In general, you don't need to tell Vera that you want to add a network device, like a security camera. Vera finds them automatically about 30 seconds after you plug them in. |
| − | + | (See special notes on adding [[Adding Sensors|sensors]] and [[IP Cameras|IP Cameras]].) | |
| − | + | == Unassigned devices == | |
| − | + | ||
| − | + | ||
| − | + | [[Image:UnnasignedDevices1.jpg|thumb|center|512px]] | |
| − | [[Image: | + | |
| − | + | ||
| − | + | [[Image:UnnasignedDevices2.jpg|thumb|center|512px]] [[Image:UnnasignedDevices3.jpg|thumb|center|512px|Unassigned devices]] If you have added new devices, but have not yet told Vera what room they're in, then before Vera will let you continue, you will see the "Unassigned Devices" page, as shown to the left, which you have to complete before you can continue to the complete list of devices. For every device you add, you need to tell Vera what room it's in. This makes it easier to keep track of which devices are which. And this is why you need to list the rooms in your house on the 'Rooms' tab before you go to the 'Devices' tab. You can also give each device a name, like "Floor lamp". The new devices will be shown in the same order you added them. If you added more than one device, you should probably use the 'Test' buttons to control the devices and to be sure you know which one is which. When you've finished putting the new devices in their correct rooms click the 'Continue' button at the bottom of the page. | |
| − | + | == Controlling your devices == | |
| − | + | [[Image:ControlButton1.JPG|thumb|215px]] [[Image:CameraTermostat.JPG|thumb|215px]] . The 'Devices' tab shows all the devices in your home organized by room and lets you control each device and change its name. Most devices will have 'Test' buttons to control them, and to show you the status. For an explanation of the device icons, control buttons and status buttons, as shown left, see: [[Device Control Status|device control and status]]. | |
| − | + | ||
| − | | | + | |
| − | | | + | |
| − | + | ||
| − | + | ||
| − | + | ||
| − | + | ||
| + | == Configuring your devices == | ||
| + | Next to each device there's a '+' button next that will show you some more options for that device. What you see depends on the type of device. | ||
| + | {| cellpadding="2" border="1" | ||
| + | |- | ||
| + | ! Type | ||
| + | ! Image | ||
| + | ! Explanation | ||
| + | |- | ||
| + | | Z-Wave Devices | ||
| + | | --todoal: Show close up of a Z-Wave device settings | ||
| + | | For an explanation of these Z-Wave settings, see [[ZWave Configuration Options]] | ||
| + | |- | ||
| + | | IP Cameras | ||
| + | | --todoal: Closeup screen shot of a camera's settings | ||
| + | | If you buy an IP camera from Mi Casa Verde, we will pre-configure it to work with Vera right out of the box. Otherwise specify the IP Address, URL and username/password as explained [[IP Cameras|here]]. There are also several options to handle archiving images, connecting the camera to lights and motions sensors, and more, explained [[IP Cameras Options|here]]. | ||
| + | |} | ||
| + | <br> | ||
| + | <br> | ||
| − | New, unassigned devices you need to put in a room | + | <br> New, unassigned devices you need to put in a room [[Image:Thedashboard.jpg|thumb|center|512px|The 'Devices' tab]] |
| − | [[Image:Thedashboard.jpg|thumb | + | |
Latest revision as of 03:32, 14 April 2010
Vera's "Devices" page shows you all the devices in your home, lets you control them, configure them, and add new devices. Vera supports a variety of Z-Wave devices, such as light switches, lamp modules, motion detectors, door locks, and so on. Mi Casa Verde sells a variety of Z-Wave devices online, or you can look for the Z-Wave logo on products you buy elsewhere. Generally Vera will work fine with any Z-Wave device that bears the Z-Wave logo shown to the left. Visit Supported Hardware to see an up-to-date list of the devices Vera is known to work with as well as notes about any special setup instructions for particular devices.Vera also supports network devices, like security cameras, which can connect to your home's network either using a normal network cable, or wirelessly using Vera's built-in Wi-Fi network. If you buy wireless networking products from Mi Casa Verde, they will be pre-configured so that they automatically connect to your Vera's wireless network. Just take them out of the box and plug them in. If you buy your wireless networking devices elsewhere, they will need the network name and password of Vera's Wi-Fi network. This information is printed on the bottom of Vera and on the Quick Start Guide. (See Supported Hardware for more info.)
Contents |
[edit] Adding devices
The first time you click the 'Devices' button, if you haven't yet added any Z-Wave devices, Vera will give you 4 choices for setting up your Z-Wave devices, as shown to the left. If you won't be adding any Z-Wave devices right now, choose option #1. You can always come back and add them later. Otherwise, most users choose option #2. The other 2 options are for users who already have a Z-Wave network setup. You can also click 'Z-Wave options' if you're an advanced Z-Wave user and want more advanced options.Vera will show you step-by-step how to add Z-Wave devices by walking around with Vera's Z-Wave dongle. You don't need to add all your Z-Wave devices at once. You can come back to 'Devices' anytime and click 'Add Z-Wave Controller' to add a Z-Wave handheld controller, or click 'Add Other Z-Wave Devices' to add any other type of Z-Wave device like a lamp module or motion sensor.
In general, you don't need to tell Vera that you want to add a network device, like a security camera. Vera finds them automatically about 30 seconds after you plug them in.
(See special notes on adding sensors and IP Cameras.)
[edit] Unassigned devices
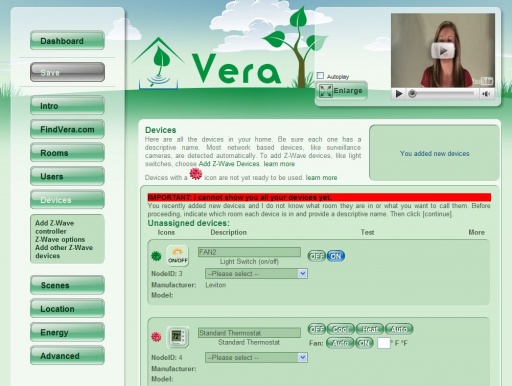
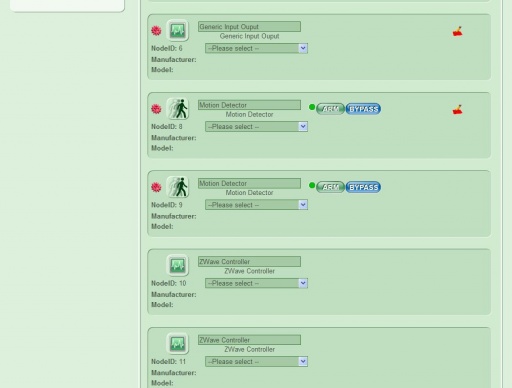
If you have added new devices, but have not yet told Vera what room they're in, then before Vera will let you continue, you will see the "Unassigned Devices" page, as shown to the left, which you have to complete before you can continue to the complete list of devices. For every device you add, you need to tell Vera what room it's in. This makes it easier to keep track of which devices are which. And this is why you need to list the rooms in your house on the 'Rooms' tab before you go to the 'Devices' tab. You can also give each device a name, like "Floor lamp". The new devices will be shown in the same order you added them. If you added more than one device, you should probably use the 'Test' buttons to control the devices and to be sure you know which one is which. When you've finished putting the new devices in their correct rooms click the 'Continue' button at the bottom of the page.[edit] Controlling your devices
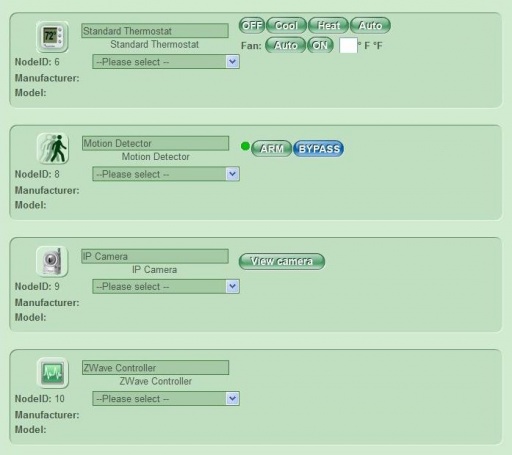
. The 'Devices' tab shows all the devices in your home organized by room and lets you control each device and change its name. Most devices will have 'Test' buttons to control them, and to show you the status. For an explanation of the device icons, control buttons and status buttons, as shown left, see: device control and status.[edit] Configuring your devices
Next to each device there's a '+' button next that will show you some more options for that device. What you see depends on the type of device.
| Type | Image | Explanation |
|---|---|---|
| Z-Wave Devices | --todoal: Show close up of a Z-Wave device settings | For an explanation of these Z-Wave settings, see ZWave Configuration Options |
| IP Cameras | --todoal: Closeup screen shot of a camera's settings | If you buy an IP camera from Mi Casa Verde, we will pre-configure it to work with Vera right out of the box. Otherwise specify the IP Address, URL and username/password as explained here. There are also several options to handle archiving images, connecting the camera to lights and motions sensors, and more, explained here. |
New, unassigned devices you need to put in a room


