IP Cameras
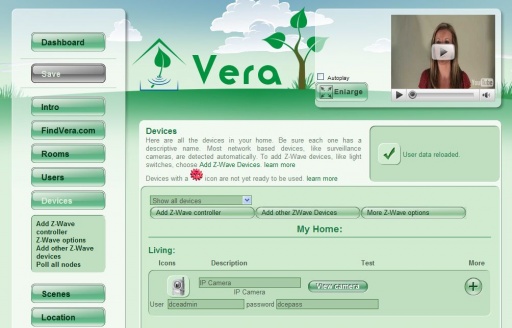
If you buy an IP camera from Mi Casa Verde, we will pre-configure it to work with Vera right out of the box. If you get the camera yourself, and it's a model that is 'Plug and Play' compatible with Vera (see 'Supported Cameras' below), then you should be sure the camera is configured to get an IP address automatically, and that the username is set to: dceadmin and the password is set to: dcepass. Vera will add the camera automatically and fill in the settings. (Specific info for users of Panasonic IP Cameras) When adding a camera that is not on the supported list, see the section 'Manually adding a camera' below.
Contents |
Supported Cameras
| Manufacturer | Device Type | Model no. | Version | Date Purchased | Location (indoor/outdoor) | Specs | Product Review | Notes |
|---|---|---|---|---|---|---|---|---|
| Panasonic | IP Camera | BL-C131/BL-C30 | all | |
Indoor | |
|
The Panasonic IP cameras work well with Vera. However, for unknown reasons, the Panasonic camera will not get an IP address on your LAN until you run the Windows software supplied with it. You do not need to install the software; just insert the CD and tell the camera to get an IP address automatically (DHCP). If you buy the camera from the Mi Casa Verde web shop we do this before we ship it so the camera will work out of the box. Mac/Linux users who buy the camera elsewhere will need a Windows PC to 'activate' the camera. Set the default username/password on the camera to: dceadmin and dcepass for Vera to detect the camera automatically, or, if you use your own username/password, add the camera to Vera manually and provide Vera your username/password to access the camera. |
Manually adding a camera
In most cases, IP cameras have a URL method for obtaining a SNAPSHOT or JPG image from the camera. If your camera supports this method, you can then use it with Vera and the FindVera.com service can archive these snapshots over time for security purposes. Most IP/Network cameras made in the past few years will have a JPG Snapshot mode. Some examples from Linksys are WVC54GCA, WVC200/WVC210. D-link, Trend-Net, and many others make similar cameras.
If your camera is not a 'Plug and Play' model or not on the supported list, you need to specify the settings for the camera by going to the 'Devices' tab on Vera's setup page, adding the camera if it's not already there, and clicking the '+' icon to edit the camera's settings.
You will need to specify:
1. the IP address or domain name of the camera
2. the URL or path to retrieve the current image from the camera as a JPEG file
3. any username and password to retrieve the JPEG file
The URL (your camera's manual may denote this as "path" or "snapshot address") needs to retrieve the actual JPEG file, not just an HTML page that has the JPEG file somewhere on it. For example, if you can view a JPEG file from your camera with this URL: http://192.168.81.5/Snapshot.JPG?Quality=Standard, then put in these settings:
IP Address: 192.168.81.5
Path: Snapshot.JPG?Quality=Standard
and be sure to provide the username/password if one is needed. After you specify this information, click the red 'Save' button, and then you can see the camera by clicking the 'View Camera' option.
Configuring the Panasonic IP camera to connect wirelessly to Vera
The Panasonic IP Cameras have a switch on the bottom: WIRED/WIRELESS. In order to connect your camera wirelessly to Vera, you'll need to follow these steps:
   - set the switch to WIRED
   - connect your camera to Vera's LAN port using an Ethernet cable
   - turn the camera on, confirm Vera's LAN LED turns orange, and wait for the IP Cam LED to turn green
   - wait for the camera to be detected in Devices -> Unassigned Device
  - assign the camera to a 'Room' and click 'Save'
(for the camera to be detected it should have the default username/password: dceadmin/dcepass and listen on port 80)
   - confirm that you can see images from the camera
   - click on the "+" sign near your camera and note its IP address (e.g. 192.168.81.200)
   - connect your computer to the same network as your camera
   - open your web browser and type in: http://camera1_ip (in this example, http://192.168.81.200)
   - login with the default camera username: dceadmin and password: dcepass
   - go to Setup -> Wireless and set SSID, Cipher and Password to Vera's wireless settings
which can be found an the bottom of Vera. (default Cipher is WPA2-PSK)
   - click 'Save Settings'
  - turn the camera's bottom switch to WIRELESS and reboot your camera by cycling its power
Your camera should now connect wirelessly to Vera. If you change your Vera's wireless settings you'll have first to update them on your cameras, so you won't lose connection to them.
Example of using a Linksys WVC54GCA or WVC210 camera with Vera
For example, if you can view a JPEG file from your camera with this URL: http://192.168.81.5/img/snapshot.cgi, then put in these settings:
Domain or IP: 192.168.81.5 (or YourDomain.MyLinksysCam.com if remote access is enabled)
Path: img/snapshot.cgi
A username and password must be used unless all users are allowed in the USERS section.
- If you have more than one camera, you will be using the PORT as part of the URL. If your second camera is on PORT 1024 and the IP is 192.168.81.6, you would use 192.168.81.6:1024 or YourDomain.MyLinksysCam.com:1024
iCAMView and some Lorex network cameras
For iCAMView based cameras, including a few Lorex-branded ones, the path would be:
showimg_pda.cgi?cam=1 for the first camera
showimg_pda.cgi?cam=2 for the second camera
Older models may require slightly different path:
pda.cgi?cam=1 for the first camera
pda.cgi?cam=2 for the second camera
Other parameters would be the same as above.
Axis IP Cameras
Path: axis-cgi/jpg/image.cgi (or lastshot.jpg depending of the model)
More information here:
Axis live_snapshots
Axis techoverview

