ExpressControls3in1
Overview

The EZMotion ZWave Wireless 3-in-1 sensor Motion-Temperature-Luminance is also known as the HomeSeer HSM100. The user's manual is here: http://www.expresscontrols.com/pdf/EZMotionOwnerManual.pdf
Features
EZMotion contains three sensors that report values to the Vera:
- Motion Sensor with adjustable sensitivity and timeout
- Temperature Sensor
- Luminosity (Light Level) Sensor reporting level of light as a percentage between the brightest and darkest levels it has encountered since being switched on for the first time
The motion sensor reports immediately whenever it has been tripped, whether the device is sleeping or not. Once motion has not been detected for a configurable amount of time, a no-motion report is sent to Vera. The temperature, light level and battery status are reported at regular intervals. The interval between each report can be changed (see below). A red LED indicates when motion is detected during the initial 10 minutes the device is awake to ensure proper alignment and sensitivity.
Requirements
- Vera firmware 1.5.622 [1] or later
- Vera 1.5.622 also requires the MiOS Update Utility Plugin for proper support of the temperature sensor
Setup and Basic Configuration
Pair with Vera
- Insert 3 AAA Batteries in EZMotion and place near Vera
- The red LED should be blinking on/off steadily.
- If the LED lights when there is motion and is off when there isn't any motion, then it must be reset first - Devices->add devices->Advanced ZWave devices-> change "include" to "exclude" then click on GO, then press the blue button and the LED should blink steadily.
- Start the Vera Join process
- Devices->Add Devices->Add Zwave Devices (Add)
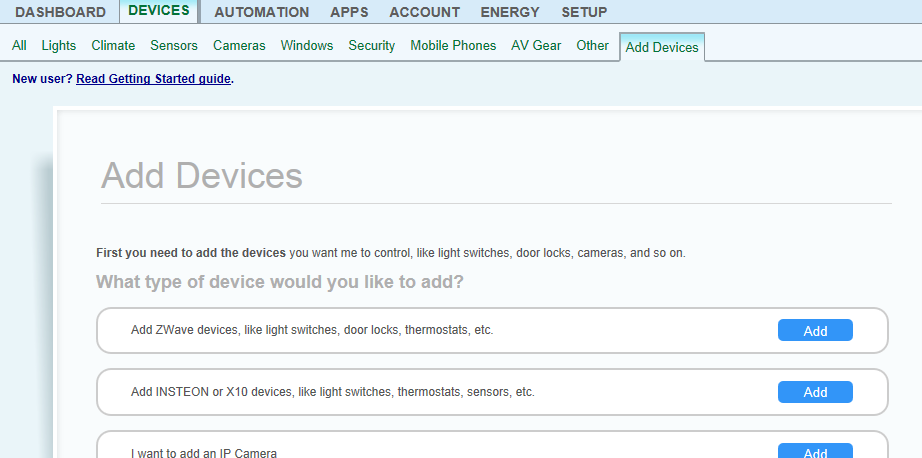
- Click on the "Option 1" button - Vera is now searching for new ZWave devices to be added
- Devices->Add Devices->Add Zwave Devices (Add)
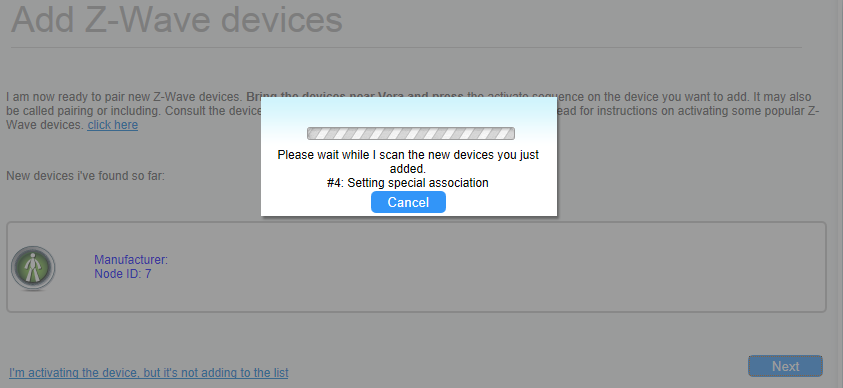
- Press the Blue button on EZMotion
- You have 10 minutes to complete configuration after each press of the blue button. After the 10 minutes, EZMotion enters a low-power "sleep" state during which time you cannot change any configuration settings.
- Vera should respond that it has found a new device - click on NEXT and you should get:
 then click on CLOSE
- Vera will now build the three devices needed for each EZMotion - Motion, Temperature and Luminance

- Vera may need a minute or two to update before the three devices show up in the dashboard
- Note that EZMotion-V1/V2 will also get a 4th device which is the "root" used for configuration
- EZMotion+V3 and later use the motion device as the root
- If all three devices are not created, then remove (exclude) EZMotion from Vera and try again. EZMotion must be within 1 meter of Vera during the pairing process.
- Use the Devices->Add Devices->Advanced ZWave devices to Exclude and then re-Include EZMotion if Option 1 fails
- EZMotion is now paired with Vera and will automatically recieve data from all sensors
- Click on the wrench icon for each device and rename to more meaningful names


Basic Configuration
- Click on the _motion_sensor device wrench icon
- This is the EZMotion root device and all configuration must be done via this device
- Click on the Settings tab
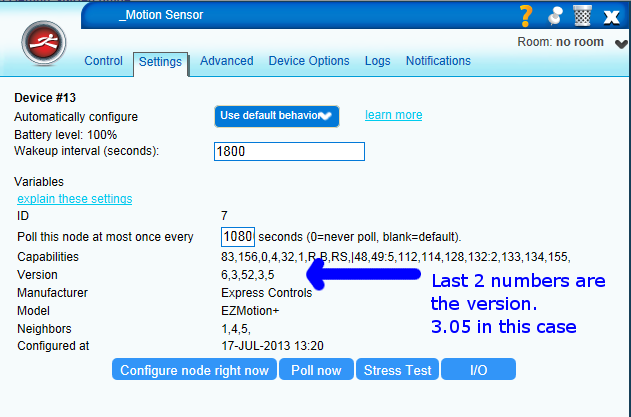
- Click on Configure Node Right Now so that the proper configuration settings are made and Vera correctly identifies all the capabilities of EZMotion and updates the current state of all sensors
- Click on Device Options to set the following basic options:

On Time
OnTime is the number of minutes that EZMotion has NOT detected motion before it turns the lights OFF. EZMotion will always turn the lights on as soon as motion is detected. Every time motion is detected the OnTime counter is restarted with this value. The counter decrements by 1 every minute. When the counter reaches zero, the lights are turned off.
- Scroll down to the Configuration Settings section of the Device Options:

- Choose the number of minutes you want the lights to turn off when no motion has been detected (default is 20 min)
- Recommended values:
- Hallways - 3 to 5 minutes
- Kitchen - 10 to 20 minutes
- Office - 30 to 60 minutes
- The more motion, the lower the value and the quicker the lights will turn off. In rooms where people are sitting, set the value to be at least 20 minutes. You don't want to constantly have to wave your hands in the air to turn the lights back on every few minutes on so set it reasonably high!
- Enter the value in the OnTime box shown above
- Click on Settings tab
- Click on Configure Node Right Now to ensure the value is programmed right now when EZMotion is next to Vera and the RF communication is excellent

Associations
Associations allow EZMotion to directly control up to 3 devices (EZMotion supports 4 but Vera needs 1). The main advantage of direct control of a device by EZMotion is that it is very quick and it will work even if Vera is not running. This means that as soon as EZMotion detects motion, it will instantly turn on the associated devices. EZMotion will also inform Vera that motion was detected and Vera can then do more advanced event triggering.
- Click on Device Options and scroll down to Associations
- Enter "1" in the Group ID and click on Add Group
- Click on Set
- This brings up a list of other devices that can be associated. Click on no more than 3 of these. Then click on Back to ZWave Options
- Click on the Settings tab
- Click on Configure Node Right Now
To test if the associations are working, turn the associated lights off, then press EZMotions blue button while it is facing away from you and hold it steady, wait 3 seconds, then move EZMotion and the lights should turn on. If they don't, repeat the steps above.
Sensitivity
Wake Up Time
Wake Up interval
The unit sleeps for the duration of the Wake Up interval, which defaults to 1800 seconds or 30 minutes. When the interval expires, it wakes up and reports Temperature and Luminosity to the Vera. Note that while all 4 devices in the Vera MIOS screen can be configured for Wake Up intervals, only the setting for the '3-in-1 Sensor' has any effect and controls both Temperature and Luminosity intervals. The Motion Sensor is unaffected by the Wakeup Interval (see On Time below)
To set the Wake Up Interval, click on the spanner (wrench) icon for the "3-in-1 sensor" device, click on Setting and set Wakeup Interval to the desired interval (in seconds, e.g. 1800(seconds) = 30 min before the sensor wakes up again). Reducing the wake up interval (causing the sensor to transmit radio signals more often) reduces battery life.
Polling Frequency
The unit can only be polled when it is either in Test mode or within 3 seconds after waking up (see Wake Up Interval above). Polling at any other time will fail since the unit will not respond. Also, every time the unit wakes up, it updates Vera with the temperature and luminosity. This means that polling is unnecessary and the polling frequency should be set to 0 (disabled) or a long interval to avoid unnecessary traffic on Vera, which could cause updates to be missed.
An exception to this rule is when Vera is set to Always Awake (see AC Power below). In that case, the unit is always awake, so never reports its values (which happens at wake-up) and must be polled at regular intervals.
Example
Consider the following example of how to configure the sensor and the Vera for a common application. Suppose you want to install a motion sensor in your garage to turn the lights on when you enter, keep them on for as long as you move around in the garage, then turn them off 5 minutes after you've left.
UI4
- Put the unit in Test mode by pressing the button on the side
- Configure the On Time to 5 minutes
- Create two scenes in Vera:
- Turn on the light when the unit has tripped (New Scene, Events tab, Add Event, Device=Motion sensor, Type of Event=Armed sensor has tripped, Name=whatever, Tripped=Yes)
- Turn off the light when the unit sends an untrip command which happens after the On Time interval. (New Scene, Events tab, Add Event, Device=Motion sensor, Type of Event=Armed sensor has tripped, Name=whatever, Tripped=No)
UI5
- Put the unit in Test mode by pressing the button on the side
- Configure the On Time to 5 minutes
- Create two scenes in Vera:
- Turn on the light when the unit has tripped (Automation -> Create Scene, Triggers tab, Add trigger, Device=Motion sensor, What type of event is the trigger?=An armed sensor is tripped, Name for this trigger=whatever, Device armed is tripped)
- Turn off the light when the unit sends an untrip command which happens after the On Time interval. (Automation -> Create Scene, Triggers tab, Add trigger, Device=Motion sensor, What type of event is the trigger?=An armed sensor is tripped, Name for this trigger=whatever, Device armed is not tripped)
Advanced Configuration
Running from AC Power
Overview
It is possible to run the unit from AC power instead of batteries, which will have the following benefits:
- Allow you to keep the unit awake permanently, allowing you to poll it and customise it without being in Test mode
- Report continuously every time motion is sensed, as opposed to waiting for the ON TIME duration in between trips
- Set the unit to report temperature and light levels at higher frequencies up to 1 minute
- Let the unit act as a Z-Wave repeater, increasing the span of your network
- Never worry about running down batteries. All of the above options are possible on battery power, but will run your batteries down within a few days
Configure
To do this, you will need to connect a AC to DC transformer that supplies 4.5v to 5.5v at up to 1amp to the battery terminals directly. Ensure that you measure that actual output voltage of the transformer using a multi/voltage meter (don't rely on its advertised rating). Any over-voltage may fry the unit. Also make sure that the polarity is correct. It may be helpful to add a diode in series with the positive terminal to prevent accidentally frying the unit if the polarity is incorrect. It will drop the voltage by 0.6v though.
Setting Stay Awake to On By default, the unit is constantly asleep and only wakes up at regular intervals to report the luminosity and temperature, before sleeping again. This is to save batteries. While asleep, the unit cannot be programmed from the Vera and cannot be polled for information. To get around this, one normally activates the Test mode by pressing the button on the side of the unit, which keeps it awake for 10 minutes so that it can be programmed. By setting the unit to stay awake constantly, you can program, poll or configure it at any time. It also has the side effect of enabling the unit to become a repeater of Z Wave signals throughout the network.
To set it, click on the spanner (wrench) icon for the "3-in-1 sensor" device, click on Device Options and set variable 5 (Stay Awake) to 1 or any number greater than 0.
To activate this setting, you will need to power off and power back on the device. Remember to save your settings first.
Setting On Time to Always Fire When the unit detects motion, it reports it by sending a Tripped command to the Vera. It then waits for the duration of the On Time and then sends un Untripped command to the Vera and waits for the next motion. Since battery life is not a consideration while on AC power, you can set it to 'Always Fire', which sends a Tripped command whenever motion is detected with no waiting period. Note, this will also prevent an Untripped command from being sent.
To set it, click on the spanner (wrench) icon for the "3-in-1 sensor" device, click on Device Options and set variable 2 (On Time) to 0.
Setting Poll frequency The unit usually only reports temperate and luminosity every time it wakes up, but since the unit is now constantly awake, you will have to configure a poll frequency to gather that information.
To set it, click on the spanner (wrench) icon for the "Motion Sensor" device, click on Settings and set "Poll this node at most every" to the required update frequency. The Wakeup interval setting on this same screen has no effect since it's been overridden by Always Awake setting..
Known issues
HSM100-S3 aka EZMotion+ (version info: 6,3,40,3,3) is not compatible with Vera (as of firmware 1.5.622).
Editing /etc/cmh/zwave_products_sys.xml might solve the problem:
Wrong:
<device id="2143" manufacturer_id="001E" basic="" generic="" specific="" child="1" prodid="2" prodtype="2" device_file="D_LightSensor1.xml" zwave_class="" default_name="" manufacturer_name="Express Controls" model="EZMotion+" />
<device id="2144" manufacturer_id="001E" basic="" generic="" specific="" child="2" prodid="2" prodtype="2" device_file="D_TemperatureSensor1.xml" zwave_class="" default_name="" manufacturer_name="Express Controls" model="EZMotion+" />
Correct:
<device id="2143" manufacturer_id="001E" basic="" generic="" specific="" child="1" prodid="2" prodtype="2" device_file="D_TemperatureSensor1.xml" zwave_class="" default_name="" manufacturer_name="Express Controls" model="EZMotion+" />
<device id="2144" manufacturer_id="001E" basic="" generic="" specific="" child="2" prodid="2" prodtype="2" device_file="D_LightSensor1.xml" zwave_class="" default_name="" manufacturer_name="Express Controls" model="EZMotion+" />
So, device 2143 defines the temperature sensor and device 2144 defines the light sensor.
Restart LuaUPnP, exclude your EZMotion+ and re-include it. You should get a motion sensor (parent device) and a temperature sensor and a light sensor.