ExpressControls3in1
m (→Configure) |
(→Requirements) |
||
| (24 intermediate revisions by 7 users not shown) | |||
| Line 1: | Line 1: | ||
| − | + | == Overview == | |
| − | + | ||
| − | + | ||
| − | + | [[image:EZmotion200.jpg|right]] | |
| − | The EZMotion Wireless 3-in-1 sensor is | + | The EZMotion ZWave Wireless 3-in-1 sensor Motion-Temperature-Luminance sensor is also known as the HomeSeer HSM100. The user's manual is here: http://www.expresscontrols.com/pdf/EZMotionOwnerManual.pdf |
| − | === Features === | + | === Features === |
| − | + | EZMotion contains three sensors that report values to Vera: | |
| − | + | ||
| − | + | ||
| − | + | ||
| − | + | *'''Motion Sensor''' with adjustable sensitivity and timeout | |
| + | *'''Temperature Sensor''' | ||
| + | *'''Luminosity (Light Level) Sensor''' reporting level of light as a percentage between the brightest and darkest levels it has encountered since being switched on for the first time | ||
| + | The motion sensor reports immediately whenever it has been tripped, whether the device is sleeping or not. | ||
| + | Once motion has not been detected for a configurable amount of time, a no-motion report is sent to Vera. | ||
| + | The temperature, light level and battery status are reported at regular intervals. The interval between each report can be changed (see below). | ||
| + | A red LED indicates when motion is detected during the initial 10 minutes the device is awake to ensure proper alignment and sensitivity. | ||
| + | === Requirements === | ||
| + | * Vera firmware [http://cp.mios.com/firmware/ 1.5.622] or later | ||
| + | ** Vera 1.5.622 also requires the [http://apps.mios.com/search.php?key=mios MiOS Update Utility Plugin] for proper support of the temperature sensor | ||
| + | * 3 AAA batteries | ||
| + | __TOC__ | ||
| − | == Basic Configuration == | + | == Setup and Basic Configuration == |
| − | + | ||
| − | + | ||
| − | + | === Pair with Vera === | |
| + | # Insert 3 AAA Batteries in EZMotion and place near Vera | ||
| + | ## [http://www.expresscontrols.com/pdf/EZMotionBattery.pdf Which batteries are best for EZMotion?] | ||
| + | # The red LED should be blinking on/off steadily. | ||
| + | ## If the LED lights when there is motion and is off when there isn't any motion, then it must be reset first - Devices->add devices->Advanced ZWave devices-> change "include" to "exclude" then click on GO, then press the blue button and the LED should blink steadily. | ||
| + | # Start the Vera Join process | ||
| + | ## Devices->Add Devices->Add Zwave Devices (Add) [[image:VeraJoin1.png]] | ||
| + | ## Click on the "Option 1" button - Vera is now searching for new ZWave devices to be added | ||
| + | # Press the Blue button on EZMotion | ||
| + | ## You have 10 minutes to complete configuration after each press of the blue button. After the 10 minutes, EZMotion enters a low-power "sleep" state during which time you cannot change any configuration settings. | ||
| + | # Vera should respond that it has found a new device - click on NEXT and you should get:[[image:VeraJoin2.png]] then click on CLOSE | ||
| + | # Vera will now build the three devices needed for each EZMotion - Motion, Temperature and Luminance [[image:EZMotionDevices.png]] | ||
| + | ## Vera may need a minute or two to update before the three devices show up in the dashboard | ||
| + | ## Note that EZMotion-V1/V2 will also get a 4th device which is the "root" used for configuration | ||
| + | ## EZMotion+V3 and later use the motion device as the root | ||
| + | ## If all three devices are not created, then remove (exclude) EZMotion from Vera and try again. EZMotion must be within 1 meter of Vera during the pairing process. | ||
| + | ## Use the Devices->Add Devices->Advanced ZWave devices to Exclude and then re-Include EZMotion if Option 1 fails | ||
| + | # EZMotion is now paired with Vera and will automatically recieve data from all sensors | ||
| + | # Click on the wrench icon for each device and rename to more meaningful names | ||
| − | === | + | === Basic Configuration === |
| − | + | # Click on the _motion_sensor device wrench icon | |
| + | ## This is the EZMotion root device and all configuration must be done via this device | ||
| + | # Click on the Settings tab [[image:EZMVersion.png]] | ||
| + | # Click on Configure Node Right Now so that the proper configuration settings are made and Vera correctly identifies all the capabilities of EZMotion and updates the current state of all sensors | ||
| + | # Click on Device Options to set the following basic options: | ||
| − | + | ==== On Time ==== | |
| + | OnTime is the number of minutes that EZMotion has NOT detected motion before it turns the lights OFF. EZMotion will always turn the lights on as soon as motion is detected. Every time motion is detected the OnTime counter is restarted with this value. The counter decrements by 1 every minute. When the counter reaches zero, the lights are turned off. | ||
| − | + | # Scroll down to the Configuration Settings section of the Device Options: [[image:OnTime.png]] | |
| + | # Choose the number of minutes you want the lights to turn off when no motion has been detected (default is 20 min) | ||
| + | ## Recommended values: | ||
| + | ## Hallways - 3 to 5 minutes | ||
| + | ## Kitchen - 10 to 20 minutes | ||
| + | ## Office - 30 to 60 minutes | ||
| + | ## The more motion, the lower the value and the quicker the lights will turn off. In rooms where people are sitting, set the value to be at least 20 minutes. You don't want to constantly have to wave your hands in the air to turn the lights back on every few minutes on so set it reasonably high! | ||
| + | # Enter the value in the OnTime box shown above | ||
| + | # Click on Settings tab | ||
| + | # Click on Configure Node Right Now to ensure the value is programmed right now when EZMotion is next to Vera and the RF communication is excellent | ||
| + | |||
| + | ==== Associations ==== | ||
| + | Associations allow EZMotion to directly control up to 3 devices (EZMotion supports 4 but Vera needs 1). The main advantage of direct control of a device by EZMotion is that it is very quick and it will work even if Vera is not running. This means that as soon as EZMotion detects motion, it will instantly turn on the associated devices. EZMotion will also inform Vera that motion was detected and Vera can then do more advanced event triggering. | ||
| + | # Click on Device Options and scroll down to Associations | ||
| + | # Enter "1" in the Group ID and click on Add Group | ||
| + | # Click on Set | ||
| + | ## This brings up a list of other devices that can be associated. Click on no more than 3 of these. Then click on Back to ZWave Options | ||
| + | # Click on the Settings tab | ||
| + | # Click on Configure Node Right Now | ||
| − | + | To test if the associations are working, turn the associated lights off, then press EZMotions blue button while it is facing away from you and hold it steady, wait 3 seconds, then move EZMotion and the lights should turn on. If they don't, repeat the steps above. | |
| + | |||
| + | ==== Sensitivity ==== | ||
| + | The sensitivity to motion can be programmed from "Pet Immune" to highly sensitive. Note that setting the sensitivity above 200 (the default) may result in false-triggers when EZMotion is operated on batteries. | ||
| + | # Click on Device Options | ||
| + | # Enter the desired sensitivity in the 1st box | ||
| + | ## Recommended values: | ||
| + | ## 10=Pet Immune - Large motion required to trigger | ||
| + | ## 50=Outdoor - Less sensitive to wind (may still false detect if the sun casts shadows that move in the wind) | ||
| + | ## 100=Hallways - hallways usually have lots of motion - this will prevent false triggers | ||
| + | ## 200=default - recommended value | ||
| + | ## >200 - not recommended unless AC powered | ||
| + | # Click on the Settings tab | ||
| + | # Click on Configure Node Right Now | ||
| − | === | + | ==== Wakeup Interval ==== |
| − | The | + | The frequency of Temperature, Light and the Battery sensors are controlled via the Wakeup Interval. EZMotion will wakeup every Wakeup Interval and send the temperature, luminance and battery levels to Vera. If EZMotion is AC powered, the sensors can be polled by Vera but when running on batteries the sensors only report in every Wakeup Interval. The Wakeup Interval can be set in increments of 360 seconds (Vera lets you type in any number of seconds but they will be rounded of in increments of 360 seconds - 6 minutes). The shorter the Wakeup Interval, the shorter the battery life. Recommendation is to leave it at 1800 (30 min) or larger. |
| + | # Click on the Settings Tab | ||
| + | # Enter the desired number of seconds for the Wakeup Interval | ||
| + | ## Enter the value in increments of 360 seconds | ||
| + | ## 1800 is the default of 30 minutes | ||
| + | ## 3600 is recommended - 60 min | ||
| + | # Click the X to close the window | ||
| + | # Click on the red SAVE in the upper right | ||
| + | # Click on Continue | ||
| + | # Click on the _motion_sensor wrench icon (spanner for you UK guys) | ||
| + | # Click on the Settings tab (wait until the unit is not busy) | ||
| + | # Click on Configure Node Right Now | ||
| − | + | ==== Install at final location - Network Heal ==== | |
| + | Once all the configuration settings have been completed, move the EZMotion to the final location. The [http://www.expresscontrols.com/pdf/EZMotionOwnerManual.pdf EZMotion Users Manual] provides recommendations on mounting which can simply be placed on a shelf or attached to a wall with 2 screws. | ||
| + | # Once EZMotion is installed in its final location: | ||
| + | # Press the blue button | ||
| + | # Return to Vera and click on Setup->Z-Wave Settings->Repair->GO | ||
| + | # A full network heal is needed to properly set the return routes so EZMotion will be able to reliably reach the ZWave network controller | ||
| + | # Recommendation is to heal 3 or 4 times to ensure routing is completly updated | ||
| + | # Note that each heal can take an hour or more | ||
| − | === | + | == Advanced Configuration == |
| − | + | ||
| − | + | ||
| − | + | ||
| − | + | ||
| − | + | ||
| − | + | ||
| − | == | + | === AC Powered - Always On === |
| − | + | EZMotion can be powered from a common +5VDC 500mA (or greater) USB power supply instead of batteries. The [http://www.expresscontrols.com/pdf/EZMotionOwnerManual.pdf Users Manual] provides details on page 4. | |
| − | + | ==== Advantages ==== | |
| − | + | * Never need to replace the batteries | |
| − | + | * Acts as a routing node improving ZWave mesh network | |
| − | + | * All sensors can be polled at anytime | |
| − | + | * OnTime can be set to 0 to send a motion detection every time motion is detected (see below) | |
| − | + | * Configuration can be changed at anytime | |
| − | + | ||
| − | ==== | + | |
| − | + | ||
| − | + | ==== Disadvantages ==== | |
| − | + | * Has to be wired to a common USB power supply (not included) and plugged into a nearby AC power outlet | |
| − | + | Up to 10 EZMotions can be powered from 1 USB power supply. Each EZMotion requires 50mA. The length of the wire can be over 100ft but check the voltage drop as it must remain above +4VDC. If the wire goes near motors or other sources of electrical noise a capacitor may be used to filter it out. Use a 100uF (or larger) capacitor right at the EZMotion pins. CAT 5 cable works fine any only 1 pair is needed. | |
| − | + | ==== Setup and Configuration ==== | |
| − | + | # Obtain a USB power supply that has +5VDC output with 500mA output (or greater) | |
| + | # Cut the USB connector off | ||
| + | # There are usually 4 wires in a USB connector - Black, Red, Green and White | ||
| + | # The Black is usually Ground (0V) | ||
| + | # The Red is usually +5VDC - measure with a multi-meter to be sure | ||
| + | # Cut off the other 2 wires - not needed | ||
| + | # Strip back the red and black wires and insert into the blue power block on the back of the EZMotion | ||
| + | # The black wire goes in the hole next to the hole in the PCB and the red goes in the other one | ||
| + | # A small flat-head screw driver is needed to screw in screws - make sure the wires are tight | ||
| + | # Plug in the EZMotion - The LED should come on | ||
| + | # Pair with Vera | ||
| + | # Click on the wrench (spanner) icon of the Motion Sensor device | ||
| + | # Click on the Device Options Tab | ||
| + | # Change the StayAwake paramter to be 1 (or any non-zero value) | ||
| + | # Click on the Settings tab | ||
| + | # Click on the Configure Node Right Now button | ||
| + | # The "Listening bit" of the ZWave protocol has now been set to 1 | ||
| + | # To enable EZMotion to participate in the Mesh Networking capabilities of ZWave you MUST now Exclude and then re-Include EZMotion with Vera | ||
| + | # Click on Devices->add Devices->Advanced ZWave devices | ||
| + | # Exclude EZMotion then press the blue button | ||
| + | # Wait about 30 seconds for Vera to update | ||
| + | # Now Include EZMotion and press the blue button | ||
| + | # Wait for the devices to be built and Vera to be updated | ||
| − | + | See the [http://www.expresscontrols.com/pdf/EZMotionOwnerManual.pdf Users Manual] for more details. The Temperature and Light sensors will still report in every Wakeup Interval but you can have Vera poll it at whatever rate desired. | |
| − | + | ===== StayAwake ===== | |
| − | + | The StayAwake parameter is NOT reset to the default factory setting when EZMotion is Excluded (reset) from a ZWave network. Setting StayAwake to a non-zero value sets the "Listening bit" in the ZWave protocol NodeInfo frame which tells Vera that EZMotion is now part of the Mesh Network and can be used to route data to other devices in the network. When EZMotion is battery powered the Listening Bit is cleared and it does not route data since it is asleep most of the time and not "listening". | |
| − | + | After setting StayAwake to a non-zero value, YOU MUST EXCLUDE and then add EZMotion back to the ZWave network so that all devices on the network know that EZMotion can now help route data in the ZWave Mesh Network. | |
| − | + | ||
| + | ===== OnTime=0 ===== | ||
| + | When EZMotion is AC wall powered, the OnTime parameter can be set to 0. When OnTime=0 EZMotion will send a motion detection report EVERY time it detects motion as often as once per minute. If EZMotion was operating on batteries, this setting would drain the batteries in a few days so it is only used when AC powered. When OnTime=0 an OFF command is never sent so EZMotion will turn the lights on, but will never turn them off. The mode allows for more complex scenes and events in Vera by changing the timeout to turn the lights off that depend on the time of day, amount of light or other factors as desired. | ||
| − | + | === Light Threshold === | |
| + | EZMotion can use its light sensor to decide to leave the lights off in a room with plenty of natural light. | ||
| + | The Light Threshold value can be set from 1 to 100%. The default is 100% which turns off this feature. | ||
| + | The Z-Wave ON command will not be sent unless the amount of light is less than the value programmed in Light Threshold. Note that the lights are not turned off when the amount of light is greater than the Light Threshold. Vera must turn off the lights when the room gets bright enough. Typically a value of 20% is a good threshold for a room with several windows. | ||
| − | == Known issues == | + | === On Value === |
| + | On Value is the value sent by the Z-Wave BASIC_SET command when motion is detected. | ||
| + | * A value of 0 will turn the lights off (not recommended). | ||
| + | * A value between 1 and 100 will set the dim level to between 1% and 100%. | ||
| + | * A value of 255 will turn the light on. | ||
| + | This feature works great when a dimming switch is directly associated with EZMotion. When motion is detected, EZMotion will immedately set the lamp to the value set here (say 50%). Vera will also be informed that motion has been detected and then depending on the time of day it can make a more complex decision on the light level. Vera might lower the light level to 10% when it is late at night so the lights are more like night-lights. During the day, it may turn the lights off if they are not needed. In the evening Vera may set the light level to 100%. There are many choices! | ||
| + | |||
| + | === Temperature Adjust === | ||
| + | Temperature Adjust used to adjust the temperature reading to make it more accurate. The value programmed is in tenths of degree Fahrenheit. The temperature reading can be adjusted up to +12.7F to -12.8F. A | ||
| + | value of 1 will adjust the temperature reading by +0.1F. A value of -1 will adjust the temperature by -0.1F. A value of 123 will adjust the temperature by +12.3F. | ||
| + | TempAdj is NOT changed when Excluded (reset) from the ZWave network. | ||
| + | |||
| + | === LED Off === | ||
| + | The LED can be turned off by setting the LED ON/OFF parameter to 0. Note that the LED may light briefly even when EZMotion is sleeping as an indicator that there is ZWave data being transferred. | ||
| + | |||
| + | === Graphs and charts === | ||
| + | Use the [http://code.mios.com/trac/mios_datamine# DataMine plugin] to graph all EZMotion sensors! | ||
| + | |||
| + | == Troubleshooting == | ||
| + | * Replace the batteries | ||
| + | * Exclude and then re-include to Vera when EZMotion is within 1m | ||
| + | * Update Vera Firmware | ||
| + | * Lights turn off when people are in the room | ||
| + | ** EZMotion detects MOTION - not people! | ||
| + | ** Place EZMotion closer to the people | ||
| + | ** Increase the OnTime | ||
| + | ** Increase the Sensitivity | ||
| + | |||
| + | See the Users Manual or ask a question on the MiCasaVerde Forums. | ||
| + | |||
| + | == Versions == | ||
| + | * [[image:EZMVersion.png|400px|right]] The Version of EZMotion is in the Root Device->Settings tab. The last 2 numbers are the application version. Examples: 1,10 would be version 1.10; 2,1 is version 2.01; 3,6 is version 3.06. | ||
| + | * There are 3 versions of EZMotion: | ||
| + | ** EZMotion V1 (HSM100-S1) - Supported in Vera UI4 and UI5 | ||
| + | *** Original EZMotion that does not have the blue power connector next to the battery adaptor. Powering with AC power requires connecting the leads to the battery clips. | ||
| + | ** EZMotion V2 (HSM100-S2) - Supported in Vera UI4 and UI5 | ||
| + | *** Same ZWave protocol as V1 but the PCB was changed to add the power block. | ||
| + | ** EZMotion+ V3 (HSM100-S3) - Requires Vera UI5 1.5.622 or later and the MIOS Update Utility plugin | ||
| + | *** Same PCB as V2 | ||
| + | *** ZWave protocol updated to meet the new Sigma Design ZWave+ protocol | ||
| + | *** ZWave+ makes it easier for software vendors like MIOS to support EZMotion as the sensors now "advertise" their capabilities instead of having to custom program each device | ||
| + | *** The Light, Temperature and Battery sensors are sent automatically by EZMotion to Vera at each Wakeup Interval | ||
| + | **** From a users persepctive, this is the main advantage of V3 | ||
| + | **** Since the sensor update is sent by EZMotion directly to Vera, communication is 1 way and much more reliable. | ||
| + | **** V1/V2 require Vera to send a command to request each sensors value which EZMotion then has to send the response (2 way communication) | ||
| + | **** In large ZWave networks V1/V2 would go back to sleep before all the sensors could be read due to the ZWave routing delays | ||
| + | |||
| + | == Known issues == | ||
| + | |||
| + | * EZMotion+ (HSM100-S3) (all version 3.xx versions) REQUIRE Vera 1.5.622 AND the MIOS Update Utility or else you get 2 luminance sensors and no Temperature sensor. | ||
| + | * HSM100-S1 (all version 1.xx EZMotions) have poor battery measurements. The battery is often 100% until the battery is nearly empty and as soon as it reaches even 50% the batteries are effectively dead. Each unit is a little different so the exact threshold where the batteries are dead is different. | ||
| + | |||
| + | [[Category:Hardware]] [[Category:Plugins]] [[Category:3rd_Party]] | ||
Latest revision as of 11:02, 26 July 2013
[edit] Overview

The EZMotion ZWave Wireless 3-in-1 sensor Motion-Temperature-Luminance sensor is also known as the HomeSeer HSM100. The user's manual is here: http://www.expresscontrols.com/pdf/EZMotionOwnerManual.pdf
[edit] Features
EZMotion contains three sensors that report values to Vera:
- Motion Sensor with adjustable sensitivity and timeout
- Temperature Sensor
- Luminosity (Light Level) Sensor reporting level of light as a percentage between the brightest and darkest levels it has encountered since being switched on for the first time
The motion sensor reports immediately whenever it has been tripped, whether the device is sleeping or not. Once motion has not been detected for a configurable amount of time, a no-motion report is sent to Vera. The temperature, light level and battery status are reported at regular intervals. The interval between each report can be changed (see below). A red LED indicates when motion is detected during the initial 10 minutes the device is awake to ensure proper alignment and sensitivity.
[edit] Requirements
- Vera firmware 1.5.622 or later
- Vera 1.5.622 also requires the MiOS Update Utility Plugin for proper support of the temperature sensor
- 3 AAA batteries
Contents |
[edit] Setup and Basic Configuration
[edit] Pair with Vera
- Insert 3 AAA Batteries in EZMotion and place near Vera
- The red LED should be blinking on/off steadily.
- If the LED lights when there is motion and is off when there isn't any motion, then it must be reset first - Devices->add devices->Advanced ZWave devices-> change "include" to "exclude" then click on GO, then press the blue button and the LED should blink steadily.
- Start the Vera Join process
- Devices->Add Devices->Add Zwave Devices (Add)
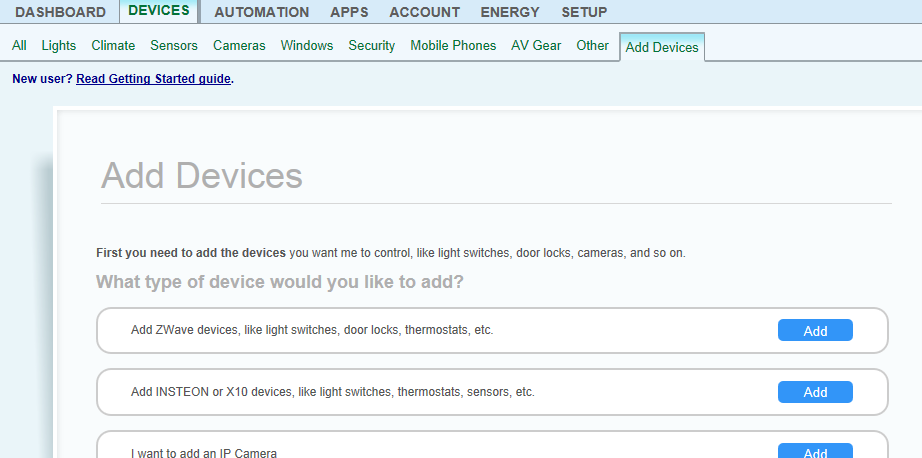
- Click on the "Option 1" button - Vera is now searching for new ZWave devices to be added
- Devices->Add Devices->Add Zwave Devices (Add)
- Press the Blue button on EZMotion
- You have 10 minutes to complete configuration after each press of the blue button. After the 10 minutes, EZMotion enters a low-power "sleep" state during which time you cannot change any configuration settings.
- Vera should respond that it has found a new device - click on NEXT and you should get:
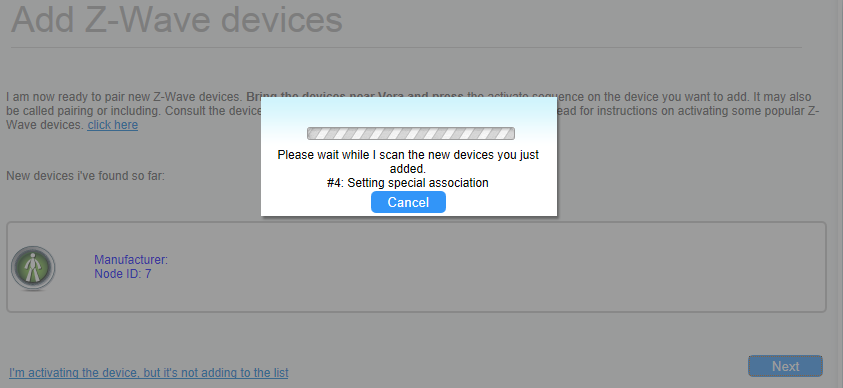 then click on CLOSE
- Vera will now build the three devices needed for each EZMotion - Motion, Temperature and Luminance

- Vera may need a minute or two to update before the three devices show up in the dashboard
- Note that EZMotion-V1/V2 will also get a 4th device which is the "root" used for configuration
- EZMotion+V3 and later use the motion device as the root
- If all three devices are not created, then remove (exclude) EZMotion from Vera and try again. EZMotion must be within 1 meter of Vera during the pairing process.
- Use the Devices->Add Devices->Advanced ZWave devices to Exclude and then re-Include EZMotion if Option 1 fails
- EZMotion is now paired with Vera and will automatically recieve data from all sensors
- Click on the wrench icon for each device and rename to more meaningful names


[edit] Basic Configuration
- Click on the _motion_sensor device wrench icon
- This is the EZMotion root device and all configuration must be done via this device
- Click on the Settings tab

- Click on Configure Node Right Now so that the proper configuration settings are made and Vera correctly identifies all the capabilities of EZMotion and updates the current state of all sensors
- Click on Device Options to set the following basic options:

[edit] On Time
OnTime is the number of minutes that EZMotion has NOT detected motion before it turns the lights OFF. EZMotion will always turn the lights on as soon as motion is detected. Every time motion is detected the OnTime counter is restarted with this value. The counter decrements by 1 every minute. When the counter reaches zero, the lights are turned off.
- Scroll down to the Configuration Settings section of the Device Options:

- Choose the number of minutes you want the lights to turn off when no motion has been detected (default is 20 min)
- Recommended values:
- Hallways - 3 to 5 minutes
- Kitchen - 10 to 20 minutes
- Office - 30 to 60 minutes
- The more motion, the lower the value and the quicker the lights will turn off. In rooms where people are sitting, set the value to be at least 20 minutes. You don't want to constantly have to wave your hands in the air to turn the lights back on every few minutes on so set it reasonably high!
- Enter the value in the OnTime box shown above
- Click on Settings tab
- Click on Configure Node Right Now to ensure the value is programmed right now when EZMotion is next to Vera and the RF communication is excellent

[edit] Associations
Associations allow EZMotion to directly control up to 3 devices (EZMotion supports 4 but Vera needs 1). The main advantage of direct control of a device by EZMotion is that it is very quick and it will work even if Vera is not running. This means that as soon as EZMotion detects motion, it will instantly turn on the associated devices. EZMotion will also inform Vera that motion was detected and Vera can then do more advanced event triggering.
- Click on Device Options and scroll down to Associations
- Enter "1" in the Group ID and click on Add Group
- Click on Set
- This brings up a list of other devices that can be associated. Click on no more than 3 of these. Then click on Back to ZWave Options
- Click on the Settings tab
- Click on Configure Node Right Now
To test if the associations are working, turn the associated lights off, then press EZMotions blue button while it is facing away from you and hold it steady, wait 3 seconds, then move EZMotion and the lights should turn on. If they don't, repeat the steps above.
[edit] Sensitivity
The sensitivity to motion can be programmed from "Pet Immune" to highly sensitive. Note that setting the sensitivity above 200 (the default) may result in false-triggers when EZMotion is operated on batteries.
- Click on Device Options
- Enter the desired sensitivity in the 1st box
- Recommended values:
- 10=Pet Immune - Large motion required to trigger
- 50=Outdoor - Less sensitive to wind (may still false detect if the sun casts shadows that move in the wind)
- 100=Hallways - hallways usually have lots of motion - this will prevent false triggers
- 200=default - recommended value
- >200 - not recommended unless AC powered
- Click on the Settings tab
- Click on Configure Node Right Now
[edit] Wakeup Interval
The frequency of Temperature, Light and the Battery sensors are controlled via the Wakeup Interval. EZMotion will wakeup every Wakeup Interval and send the temperature, luminance and battery levels to Vera. If EZMotion is AC powered, the sensors can be polled by Vera but when running on batteries the sensors only report in every Wakeup Interval. The Wakeup Interval can be set in increments of 360 seconds (Vera lets you type in any number of seconds but they will be rounded of in increments of 360 seconds - 6 minutes). The shorter the Wakeup Interval, the shorter the battery life. Recommendation is to leave it at 1800 (30 min) or larger.
- Click on the Settings Tab
- Enter the desired number of seconds for the Wakeup Interval
- Enter the value in increments of 360 seconds
- 1800 is the default of 30 minutes
- 3600 is recommended - 60 min
- Click the X to close the window
- Click on the red SAVE in the upper right
- Click on Continue
- Click on the _motion_sensor wrench icon (spanner for you UK guys)
- Click on the Settings tab (wait until the unit is not busy)
- Click on Configure Node Right Now
[edit] Install at final location - Network Heal
Once all the configuration settings have been completed, move the EZMotion to the final location. The EZMotion Users Manual provides recommendations on mounting which can simply be placed on a shelf or attached to a wall with 2 screws.
- Once EZMotion is installed in its final location:
- Press the blue button
- Return to Vera and click on Setup->Z-Wave Settings->Repair->GO
- A full network heal is needed to properly set the return routes so EZMotion will be able to reliably reach the ZWave network controller
- Recommendation is to heal 3 or 4 times to ensure routing is completly updated
- Note that each heal can take an hour or more
[edit] Advanced Configuration
[edit] AC Powered - Always On
EZMotion can be powered from a common +5VDC 500mA (or greater) USB power supply instead of batteries. The Users Manual provides details on page 4.
[edit] Advantages
- Never need to replace the batteries
- Acts as a routing node improving ZWave mesh network
- All sensors can be polled at anytime
- OnTime can be set to 0 to send a motion detection every time motion is detected (see below)
- Configuration can be changed at anytime
[edit] Disadvantages
- Has to be wired to a common USB power supply (not included) and plugged into a nearby AC power outlet
Up to 10 EZMotions can be powered from 1 USB power supply. Each EZMotion requires 50mA. The length of the wire can be over 100ft but check the voltage drop as it must remain above +4VDC. If the wire goes near motors or other sources of electrical noise a capacitor may be used to filter it out. Use a 100uF (or larger) capacitor right at the EZMotion pins. CAT 5 cable works fine any only 1 pair is needed.
[edit] Setup and Configuration
- Obtain a USB power supply that has +5VDC output with 500mA output (or greater)
- Cut the USB connector off
- There are usually 4 wires in a USB connector - Black, Red, Green and White
- The Black is usually Ground (0V)
- The Red is usually +5VDC - measure with a multi-meter to be sure
- Cut off the other 2 wires - not needed
- Strip back the red and black wires and insert into the blue power block on the back of the EZMotion
- The black wire goes in the hole next to the hole in the PCB and the red goes in the other one
- A small flat-head screw driver is needed to screw in screws - make sure the wires are tight
- Plug in the EZMotion - The LED should come on
- Pair with Vera
- Click on the wrench (spanner) icon of the Motion Sensor device
- Click on the Device Options Tab
- Change the StayAwake paramter to be 1 (or any non-zero value)
- Click on the Settings tab
- Click on the Configure Node Right Now button
- The "Listening bit" of the ZWave protocol has now been set to 1
- To enable EZMotion to participate in the Mesh Networking capabilities of ZWave you MUST now Exclude and then re-Include EZMotion with Vera
- Click on Devices->add Devices->Advanced ZWave devices
- Exclude EZMotion then press the blue button
- Wait about 30 seconds for Vera to update
- Now Include EZMotion and press the blue button
- Wait for the devices to be built and Vera to be updated
See the Users Manual for more details. The Temperature and Light sensors will still report in every Wakeup Interval but you can have Vera poll it at whatever rate desired.
[edit] StayAwake
The StayAwake parameter is NOT reset to the default factory setting when EZMotion is Excluded (reset) from a ZWave network. Setting StayAwake to a non-zero value sets the "Listening bit" in the ZWave protocol NodeInfo frame which tells Vera that EZMotion is now part of the Mesh Network and can be used to route data to other devices in the network. When EZMotion is battery powered the Listening Bit is cleared and it does not route data since it is asleep most of the time and not "listening".
After setting StayAwake to a non-zero value, YOU MUST EXCLUDE and then add EZMotion back to the ZWave network so that all devices on the network know that EZMotion can now help route data in the ZWave Mesh Network.
[edit] OnTime=0
When EZMotion is AC wall powered, the OnTime parameter can be set to 0. When OnTime=0 EZMotion will send a motion detection report EVERY time it detects motion as often as once per minute. If EZMotion was operating on batteries, this setting would drain the batteries in a few days so it is only used when AC powered. When OnTime=0 an OFF command is never sent so EZMotion will turn the lights on, but will never turn them off. The mode allows for more complex scenes and events in Vera by changing the timeout to turn the lights off that depend on the time of day, amount of light or other factors as desired.
[edit] Light Threshold
EZMotion can use its light sensor to decide to leave the lights off in a room with plenty of natural light. The Light Threshold value can be set from 1 to 100%. The default is 100% which turns off this feature. The Z-Wave ON command will not be sent unless the amount of light is less than the value programmed in Light Threshold. Note that the lights are not turned off when the amount of light is greater than the Light Threshold. Vera must turn off the lights when the room gets bright enough. Typically a value of 20% is a good threshold for a room with several windows.
[edit] On Value
On Value is the value sent by the Z-Wave BASIC_SET command when motion is detected.
- A value of 0 will turn the lights off (not recommended).
- A value between 1 and 100 will set the dim level to between 1% and 100%.
- A value of 255 will turn the light on.
This feature works great when a dimming switch is directly associated with EZMotion. When motion is detected, EZMotion will immedately set the lamp to the value set here (say 50%). Vera will also be informed that motion has been detected and then depending on the time of day it can make a more complex decision on the light level. Vera might lower the light level to 10% when it is late at night so the lights are more like night-lights. During the day, it may turn the lights off if they are not needed. In the evening Vera may set the light level to 100%. There are many choices!
[edit] Temperature Adjust
Temperature Adjust used to adjust the temperature reading to make it more accurate. The value programmed is in tenths of degree Fahrenheit. The temperature reading can be adjusted up to +12.7F to -12.8F. A value of 1 will adjust the temperature reading by +0.1F. A value of -1 will adjust the temperature by -0.1F. A value of 123 will adjust the temperature by +12.3F. TempAdj is NOT changed when Excluded (reset) from the ZWave network.
[edit] LED Off
The LED can be turned off by setting the LED ON/OFF parameter to 0. Note that the LED may light briefly even when EZMotion is sleeping as an indicator that there is ZWave data being transferred.
[edit] Graphs and charts
Use the DataMine plugin to graph all EZMotion sensors!
[edit] Troubleshooting
- Replace the batteries
- Exclude and then re-include to Vera when EZMotion is within 1m
- Update Vera Firmware
- Lights turn off when people are in the room
- EZMotion detects MOTION - not people!
- Place EZMotion closer to the people
- Increase the OnTime
- Increase the Sensitivity
See the Users Manual or ask a question on the MiCasaVerde Forums.
[edit] Versions
- The Version of EZMotion is in the Root Device->Settings tab. The last 2 numbers are the application version. Examples: 1,10 would be version 1.10; 2,1 is version 2.01; 3,6 is version 3.06.

- There are 3 versions of EZMotion:
- EZMotion V1 (HSM100-S1) - Supported in Vera UI4 and UI5
- Original EZMotion that does not have the blue power connector next to the battery adaptor. Powering with AC power requires connecting the leads to the battery clips.
- EZMotion V2 (HSM100-S2) - Supported in Vera UI4 and UI5
- Same ZWave protocol as V1 but the PCB was changed to add the power block.
- EZMotion+ V3 (HSM100-S3) - Requires Vera UI5 1.5.622 or later and the MIOS Update Utility plugin
- Same PCB as V2
- ZWave protocol updated to meet the new Sigma Design ZWave+ protocol
- ZWave+ makes it easier for software vendors like MIOS to support EZMotion as the sensors now "advertise" their capabilities instead of having to custom program each device
- The Light, Temperature and Battery sensors are sent automatically by EZMotion to Vera at each Wakeup Interval
- From a users persepctive, this is the main advantage of V3
- Since the sensor update is sent by EZMotion directly to Vera, communication is 1 way and much more reliable.
- V1/V2 require Vera to send a command to request each sensors value which EZMotion then has to send the response (2 way communication)
- In large ZWave networks V1/V2 would go back to sleep before all the sensors could be read due to the ZWave routing delays
- EZMotion V1 (HSM100-S1) - Supported in Vera UI4 and UI5
[edit] Known issues
- EZMotion+ (HSM100-S3) (all version 3.xx versions) REQUIRE Vera 1.5.622 AND the MIOS Update Utility or else you get 2 luminance sensors and no Temperature sensor.
- HSM100-S1 (all version 1.xx EZMotions) have poor battery measurements. The battery is often 100% until the battery is nearly empty and as soon as it reaches even 50% the batteries are effectively dead. Each unit is a little different so the exact threshold where the batteries are dead is different.