Ping Sensor Plugin
Contents |
Introduction
This Luup-device can ping different IP-based network devices like routers, computers, iPhones, network-printers, even internet sites and so on. The result of the ping is being reported to Vera. It's intended to be used as sensor in scenes. So you can trigger scenes if a device (or site) becomes available or unavailable.How does it work
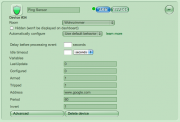
For every ip you want to observe a own Luup device has to be created. After installation you only have to configure the IP or FQDN in the "Address" field and a delay time in seconds when a ping should occur has to be put in the "Period" field.
Use the Arm / Bypass buttons to activate/deactivate your sensor
The field "Tripped" and the red/green circle shows you, if your observed network device is reachable or not.
Installation
To install and configure the sensor do the following steps:
- Download the ZIP file containing the device definitions from here
- Unzip the file to harddisk. The following files are contained:
D_PingSensor.xml
D_PingSensor_Invert.xml
I_PingSensor.xml
S_PingSensor.xml
S_AwarenessSensor.xml
I_AwarenessSensor.xml - Goto Devices --> Luup plugins --> Luup files
- click the (Browse) buttons on the right, and enter the 6 filenames referenced above.
- Select the checkbox "[x] Restart Luup after upload" and click (Go)
- ... wait whilst it uploads and restarts the Lua engine ...
- If successful, you'll see the 6x files listed in the system.
- Navigate to Devices --> Luup plugins, scroll to the bottom at the Add device form.
- Type "D_PingSensor.xml" if you're going to use the normal mode or type "D_PingSensor_Invert.xml" if you plan to use the inverted mode, afterwards click (Add Device), type in a name of your choice against the device then click (Save)
- After that is done, return again Devices --> Luup plugins and click (+) Insert the IP or domain name of the device you want to observe in the field "Address"
- Change the value in the field "Period" to change the time in seconds, which Vera waits between two pings. (e.g. you want to ping a host every minute, you would enter the value 60)
- click (Save) in the field "Tripped" can you see, if your remote device is available ("1") or not ("0") or you have a look at the red/green circle.
- enjoy! :)
Changelog
Version 1.4
- Removed some inconsistency in I_AwarenessSensor.xml
Version 1.3
- invert red/green circle by configuration
- renamed scene events and result description ("Got response?" -> "Device responded") to describe the actions more appropriate
Version 1.2
- Changed file I_PingSensor.xml
- Now that device acts less "aggressive" when no state change occurs. Formerly it triggered the scene event after every ping. E.g. if you turn a lamp out by hand which is also controlled by the ping sensor It was turned on after every ping again. Now only state changes from "ping -> no ping" or "no ping -> ping" fire events.
Version 1.1
- Update the UI on state-change (device becomes visible or unvisible to the plugin)
- Display a red / green circle (similar to motion sensors) to indicate the presence of a device
- Active / Inactive Buttons (even this should work similar to the motion sensors "Armed" and "Bypass")
- Show up as a sensor in the scene-events.
- Device is now completely controlable via UPnP function calls
Version 1.0
- a new device was born
- this version was quite unusable in practice. It could be used to learn from ;)
Known issues
- A custom icon should be displayed instead of the na.gif -> No chance at the moment. The standard motion sensor icon will show up.
Discussion
The Ping Sensor plugin is discussed in this forum thread:
http://forum.micasaverde.com/index.php?topic=1997.0
Feel free to ask questions on that thread, as well as make any suggestions & contributions to the future development of the Ping Sensor plugin's functionality.
