Wayne-Dalton WDHA-12
How to Configure Vera with Wayne-Dalton WDHA-12 Gateway
(written Jan-2010 based on Vera firmware 1.0.979)
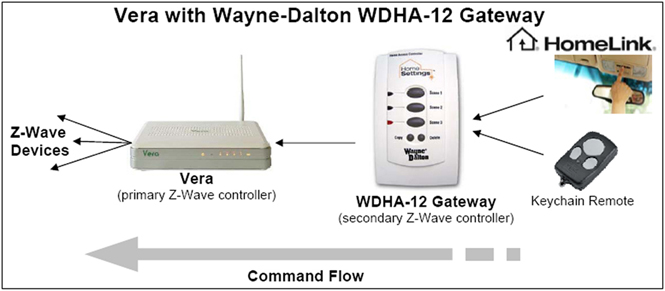
The Wayne-Dalton WDHA-12 Gateway funnels commands from HomeLink devices and WD keychain remote controls into Vera. Neither can speak directly to Vera (even though the WD keychain device is a Z-wave device of a sort).
The Gateway is configured as a secondary Z-wave controller which means that it’s only role is to forward commands to Vera. Once configured as a secondary controller, it no longer speaks directly to devices, rather it only forwards commands to Vera (the primary controller in the configuration below) which in turn sends on the commands to devices. The Gateway has 3 scene buttons and each can be attached to a different scene in Vera.
Step 1 – Set up Vera.
Make sure you already have Vera working with at least one scene so that you have one less variable to be concerned with.
Step 2 – Turn Gateway into secondary controller and link to Vera.
Make sure you’re logged in to Vera.
On the Gateway, press copy button AND THEN press Scene 1 button (despite what the Gateway instructions say, if you press copy and Scene 1 at the same time the process doesn’t seem to work). Hold both buttons until all three LEDs light up and then release both.
Immediately after above, go to Vera Dashboard, click Setup, then click Devices and then click Z-Wave. Now click “Add Z-Wave controller”. Within 60 seconds you will see “device detected. Added Node n”
For some reason, it appears that you need to perform this step 2 a second time for it to work properly. The second time you do this, Vera will recognize that the device has previously been detected and will display the node number again.
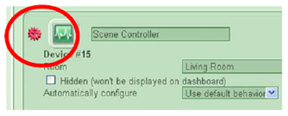
The Gateway is now configured as a secondary controller. Note: In the Devices list, Vera will show the “red gear” status (as below) indicating that the device is not properly configured. This does not seem to matter.
Step 3 – Assign Gateway scene buttons to Vera scenes.
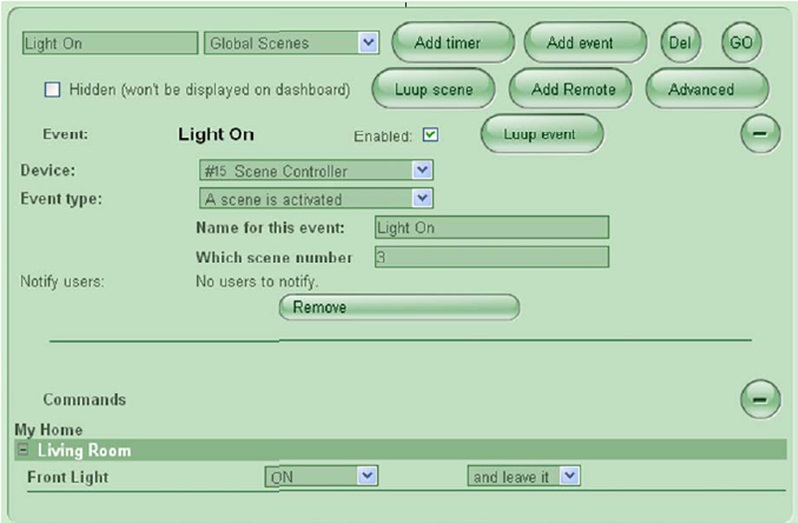
Click Scenes. Click Add scene. Then click Add event, select your scene controller in the Devices popup and then select Event type “A scene is activated”. Then name the event and type in the digit 1, 2 or 3 in “scene number” corresponding to the Gateway scene number/button you want to use. Finally, choose among the commands available for your device.
Step 4 – Test.
On the Gateway, press the scene number/button that you assigned in Step 3 and confirm that the proper commands are executed.
As a double check, you can look at Vera’s logs. Click Advanced, then click Logs and then Show Z-Wave jobs.
Optional – Step 5 – Connect to HomeLink.
To configure a HomeLink controller so that HomeLink triggers the Gateway which in turn triggers a Vera scene, follow the instructions in the WDHA-12 manual. One thing to know that the Gateway manual doesn’t tell you: To “pair” (the HomeLink term is “teach”) the HomeLink controller with the Gateway, the Gateway must be unplugged from the AC. However it will only work as a gateway once you plug it back into the AC, so you can’t test it while it’s still unplugged. It turns out that when the Gateway is unplugged it works as a handheld controller (meaning the buttons work but it doesn't pass thru HomeLink commands) and only works as a Gateway when it’s plugged in.
(if the directions in the WDHA-12 manual for pairing your care dont work- try homelink.com and select the programming tab. Choose "pragram a garage door opener' from wayne dalton and pick your vehicle. It will provide you the proper sequence of things to do in your vehicle while following the WDHA instructions for the button presses on the gateway)


