Manually create IP Camera device
| Line 10: | Line 10: | ||
Here are the instructions to create a camera device. It is assumed that the camera is connected to the network and configured. | Here are the instructions to create a camera device. It is assumed that the camera is connected to the network and configured. | ||
| − | = | + | = UI = |
| − | + | == UI7 == | |
| − | + | ||
| − | + | ||
| − | + | 1.Go to '''Apps''' >> '''Develop Apps''' >> '''Create device'''. | |
* In the '''Description''' field enter a name for the device. | * In the '''Description''' field enter a name for the device. | ||
| − | * In the ''' | + | * In the '''Upnp Device Filename''' field enter ''D_DigitalSecurityCamera2.xml''. |
| − | * In the ''' | + | * In the '''Upnp Implementation Filename''' field enter ''I_FoscamPTZ.xml''. |
| − | * In the ''' | + | * In the '''Ip Address''' field enter the IP address and port of the camera. If your camera is on the Internet, enter the URL of the camera here, e.g. http://mycamera.myserver.com:8081 |
| + | * In the '''MAC''' field enter the MAC address of the camera. This is required for archiving snapshots on our servers. If you don't want to archive snapshots on our servers, you can leave this empty. | ||
| − | [[File: | + | [[File:create_camera.JPG|The Create Device page]] |
| − | 3. Click ''Create device'' | + | 3. Click ''Create device'' |
| − | + | ||
| − | + | ||
| − | + | ||
| − | + | ||
| − | + | ||
| − | + | ||
| − | + | ||
| − | + | ||
| − | + | ||
| − | + | ||
== UI5 == | == UI5 == | ||
| Line 53: | Line 42: | ||
[[File:ui5_my_camera_settings.png|The camera settings]] | [[File:ui5_my_camera_settings.png|The camera settings]] | ||
| + | |||
| + | 6. Save. | ||
| + | |||
| + | == UI4 == | ||
| + | |||
| + | 1. First install the '''Generic IP Camera Plugin''' from the MiOS Marketplace. | ||
| + | |||
| + | [[File:mios_marketplace.png|The MiOS Marketplace section with the Generic IP Camera Plugin installed]] | ||
| + | |||
| + | 2. After the plugin was installed go to '''MiOS Developers''' (''Vera Developers'' in 1.1.1365) >> '''Create Device'''. | ||
| + | * In the '''Description''' field enter a name for the device. | ||
| + | * In the '''UpnpDevFilename''' field enter ''D_DigitalSecurityCamera1.xml''. | ||
| + | * In the '''IpAddress''' field enter the IP address and port of the camera. If your camera is on the Internet, enter the URL of the camera here, e.g. http://mycamera.myserver.com:8081 | ||
| + | * In the '''MacAddress''' field enter the MAC address of the camera. This is required for archiving snapshots on our servers. If you don't want to archive snapshots on our servers, you can leave this empty. | ||
| + | |||
| + | [[File:create_device.png|The ''Create device'' page]] | ||
| + | |||
| + | 3. Click ''Create device'' and reload the Luup engine (press the curved arrows in the upper right corner of the dashboard). | ||
| + | |||
| + | [[File:my_camera.png|The camera device after it was created and the engine was restarted]] | ||
| + | |||
| + | 4. Open the camera's control panel (click on the wrench). | ||
| + | |||
| + | 5. Open the '''Settings''' tab and enter the required information (URL, username, password, etc.). | ||
| + | |||
| + | [[File:my_camera_settings.png|The camera settings]] | ||
6. Save. | 6. Save. | ||
Revision as of 18:06, 28 March 2015
MiOS can install some IP cameras automatically when it detects them on the network. Usually it's one of the cameras from this list:
- VistaCam
- Panasonic camera
- Foscam camera
- D-Link camera
However, if you have a camera that's not one of the above, or if your camera wasn't automatically installed, you can either add a camera using the Add camera wizard or create the device manually.
Here are the instructions to create a camera device. It is assumed that the camera is connected to the network and configured.
Contents |
UI
UI7
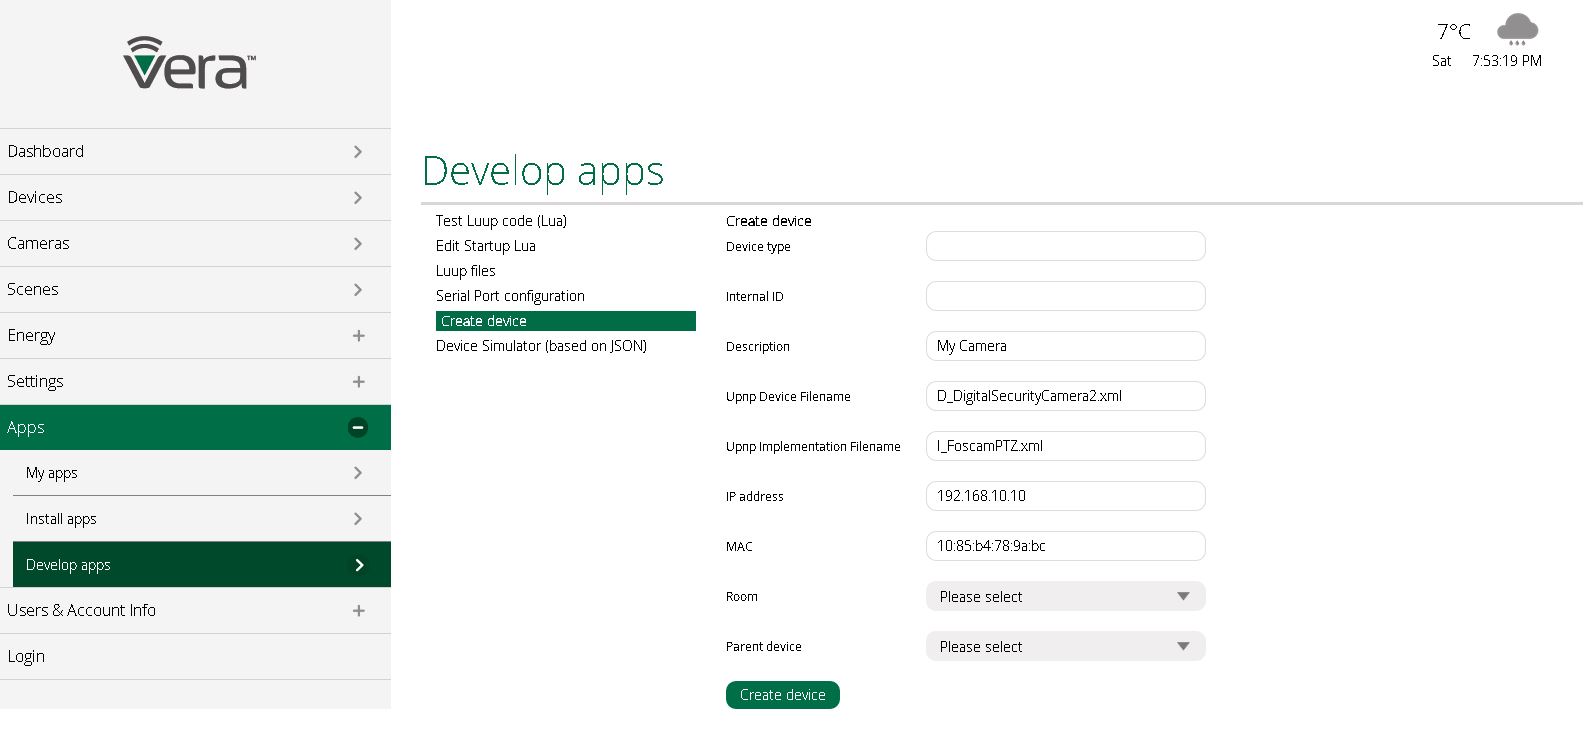
1.Go to Apps >> Develop Apps >> Create device.
- In the Description field enter a name for the device.
- In the Upnp Device Filename field enter D_DigitalSecurityCamera2.xml.
- In the Upnp Implementation Filename field enter I_FoscamPTZ.xml.
- In the Ip Address field enter the IP address and port of the camera. If your camera is on the Internet, enter the URL of the camera here, e.g. http://mycamera.myserver.com:8081
- In the MAC field enter the MAC address of the camera. This is required for archiving snapshots on our servers. If you don't want to archive snapshots on our servers, you can leave this empty.
3. Click Create device
UI5
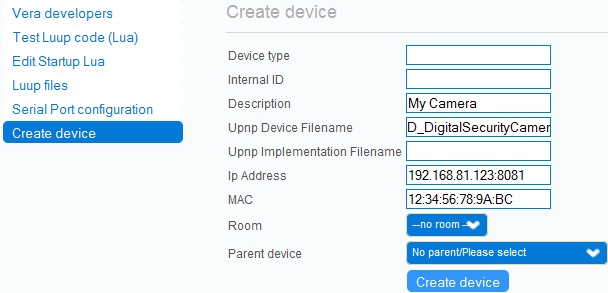
1.Go to Apps >> Develop Apps >> Create device.
- In the Description field enter a name for the device.
- In the Upnp Device Filename field enter D_DigitalSecurityCamera1.xml.
- In the Ip Address field enter the IP address and port of the camera. If your camera is on the Internet, enter the URL of the camera here, e.g. http://mycamera.myserver.com:8081
- In the MAC field enter the MAC address of the camera. This is required for archiving snapshots on our servers. If you don't want to archive snapshots on our servers, you can leave this empty.
3. Click Create device and reload the Luup engine (press the blue Reload button in the upper right corner of the dashboard).
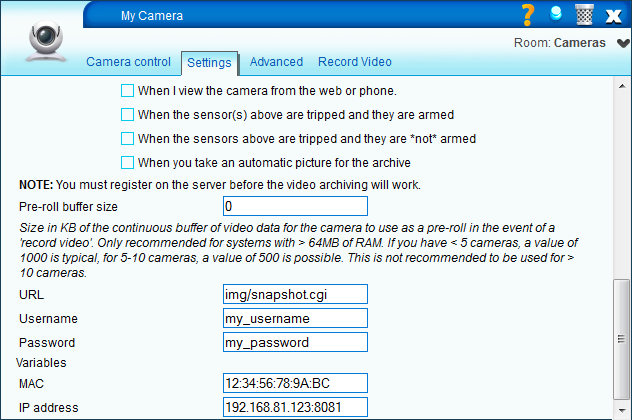
4. Open the camera's control panel (click on the wrench).
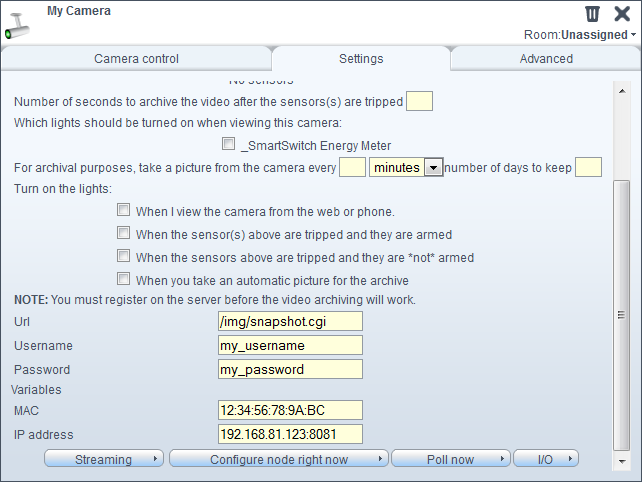
5. Open the Settings tab and enter the required information (URL, username, password, etc.).
6. Save.
UI4
1. First install the Generic IP Camera Plugin from the MiOS Marketplace.
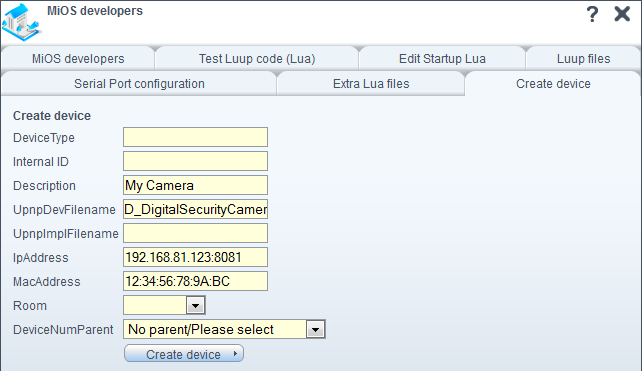
2. After the plugin was installed go to MiOS Developers (Vera Developers in 1.1.1365) >> Create Device.
- In the Description field enter a name for the device.
- In the UpnpDevFilename field enter D_DigitalSecurityCamera1.xml.
- In the IpAddress field enter the IP address and port of the camera. If your camera is on the Internet, enter the URL of the camera here, e.g. http://mycamera.myserver.com:8081
- In the MacAddress field enter the MAC address of the camera. This is required for archiving snapshots on our servers. If you don't want to archive snapshots on our servers, you can leave this empty.
3. Click Create device and reload the Luup engine (press the curved arrows in the upper right corner of the dashboard).
4. Open the camera's control panel (click on the wrench).
5. Open the Settings tab and enter the required information (URL, username, password, etc.).
6. Save.
