HRT4-ZW
| Line 5: | Line 5: | ||
== Configuration == | == Configuration == | ||
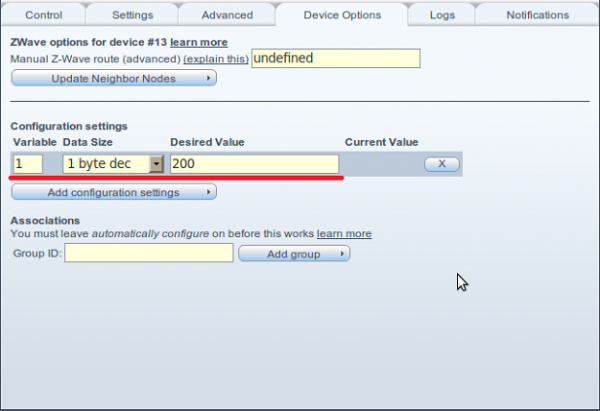
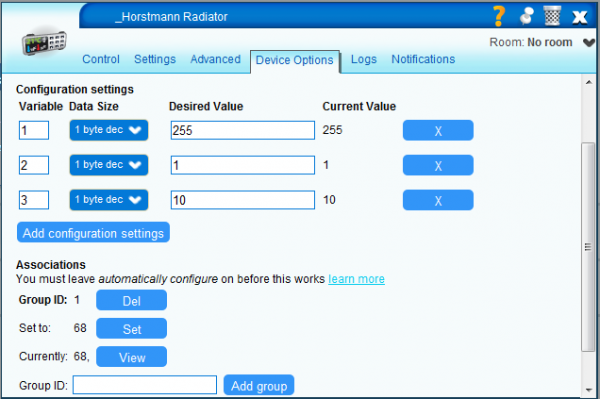
| − | After you include the HRT4-ZW thermostat in Vera, you will have to change some configuration settings in order to make it work properly in the network and report the temperature to Vera. By default HRT4 is set to not do this automatically (see configuration parameter 1 | + | After you include the HRT4-ZW thermostat in Vera, you will have to change some configuration settings in order to make it work properly in the network and report the temperature to Vera. By default HRT4 is set to not do this automatically (see configuration parameter 1 below) so you have to add this parameter yourself and insert a value between 128 - 255. To add a new configuration parameter, you have to click on the little wrench on the Dashboard, go to Device Options and click on ‘Add configuration settings’, then fill in the values for Parameter 1 as below in the pictures. |
{| width="80%" border="0" align="center" cellpadding="1" cellspacing="1" | {| width="80%" border="0" align="center" cellpadding="1" cellspacing="1" | ||
Revision as of 19:02, 1 February 2012
Contents |
Horstmann HRT4-ZW THERMOSTAT
The user manual can be found here and the Z-Wave information here.
Configuration
After you include the HRT4-ZW thermostat in Vera, you will have to change some configuration settings in order to make it work properly in the network and report the temperature to Vera. By default HRT4 is set to not do this automatically (see configuration parameter 1 below) so you have to add this parameter yourself and insert a value between 128 - 255. To add a new configuration parameter, you have to click on the little wrench on the Dashboard, go to Device Options and click on ‘Add configuration settings’, then fill in the values for Parameter 1 as below in the pictures.
| UI4 | UI5 |

|

|
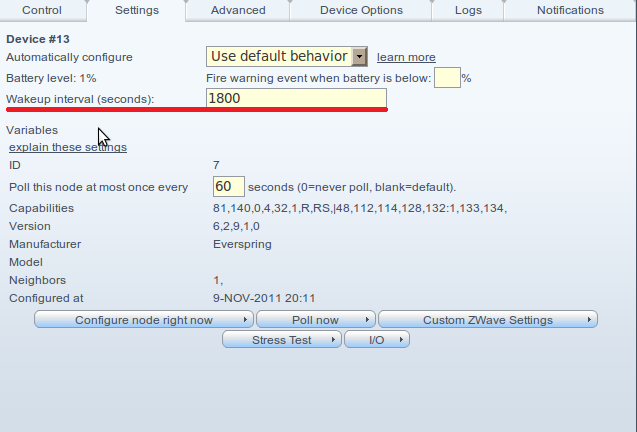
If you also want to make the thermostat wake up more frequently, you can specify a lower value for the Wakeup interval by clicking on the little wrench, go to Settings and edit the ‘Wakeup interval’ field as shown in the picture below. By default this value is set to 1800 seconds, but you can set it to a minimal value of 256 seconds. This is the shortest wakeup time interval that we know about for this sensor.
Configuration Parameters
Configuration Command Class (V1)
The unit supports 3 single byte configurations for the temperature sensor functionality of the unit in the range 1 – 3 respectively.
Configuration Parameter Number 1:
0–127 disables temperature sensor, 128-255 enables temperature sensor. Default = 0.
Configuration Parameter Number 2:
0-127 = Celsius, 128-255 = Fahrenheit. Default = 0.
Configuration Parameter Number 3:
1 – 100 = Delta T in steps of 0.1 degree. Default = 10 (1.0).
Association with ASR-ZW Receiver
To make the HRT4-ZW work together with the ASR-ZW Receiver (they usually come in the same package) you have to include both of them in Veras Z-Wave network, then set up associations by clicking on the little wrench key on the HRT4-ZW and go to Device Options. In the Associations section you have to type in the Group ID number 1, then click on Set, Save the changes and make sure to wake up the thermostat in order for it to receive the configuration changes.
