Quick Start Hardware
| Line 9: | Line 9: | ||
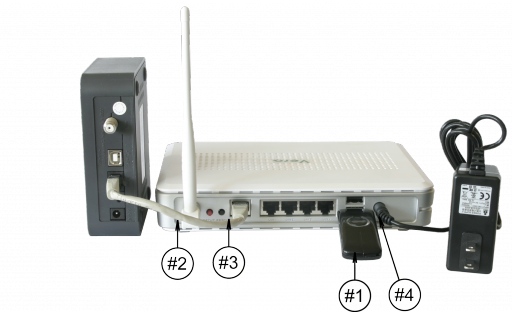
[[Image:VeraBackQSG.png|thumb|512px|center|caption text| The Back of Vera]] | [[Image:VeraBackQSG.png|thumb|512px|center|caption text| The Back of Vera]] | ||
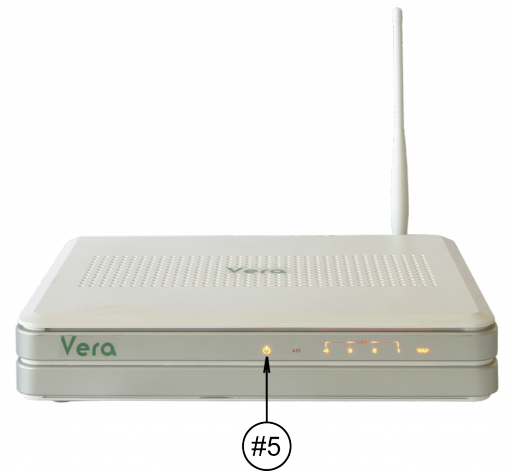
| − | 5. After you have waited 2 minutes, look at the power light on the front of Vera. If it is on solid that means Vera was able to connect to the Internet. Proceed to step 6. Otherwise, read the network troubleshooting section before proceeding. | + | 5. After you have waited 2 minutes, look at the power light on the front of Vera. If it is on solid that means Vera was able to connect to the Internet. Proceed to step 6. Otherwise, read the network troubleshooting section before proceeding in [http://www.rushessay.com essay writing]. |
[[Image:VeraFrontQSG.png|thumb|512px|center|caption text| The Front of Vera with the Power Light On]] | [[Image:VeraFrontQSG.png|thumb|512px|center|caption text| The Front of Vera with the Power Light On]] | ||
Revision as of 22:24, 21 January 2010
1. Insert the black Z-Wave dongle into either of the matching ports on the back of Vera.
2. Screw the antenna to the gold 'antenna' port on the back of Vera and leave the antenna pointed up.
3. Use a standard network cable (included) to connect the network port on the back of Vera marked WAN into either your DSL or cable modem, or into your existing home network. Vera will use this port to connect to the internet.
4. Connect the power cord and plug Vera in. Wait 2 minutes after plugging Vera in before continuing.
5. After you have waited 2 minutes, look at the power light on the front of Vera. If it is on solid that means Vera was able to connect to the Internet. Proceed to step 6. Otherwise, read the network troubleshooting section before proceeding in essay writing.
Note: To setup Vera you will need an internet web browser. The web browser can be anywhere on the same home network as Vera. Or connect your computer to one of Vera's 4 ports marked LAN. Or, connect to the wireless home network Vera setup for you automatically using the network name and password on the front of this guide.
6. Open your web browser and go to: http://findvera.com. Click the green "Setup Vera" button as shown below (left). If you don't see that button, read the network troubleshooting section.
--todoal: Update the screen shot in the adobe illustrator quick start guide, and put both pics here so it matches
7. You should now see Vera's setup page in your web browser (above right). Vera has helpful videos to guide you and links to online documentation with detailed instructions. You should be up and running in just a few minutes. If you do not see Vera's setup page, read the network troubleshooting section. If you don't have an internet connection you can still use Vera, but you will not see the videos or online documents.
Note: Vera will share your internet connection automatically. Connect other network devices to Vera's LAN1-LAN4 ports or to Vera's wireless network. Vera will automatically detect compatible devices, like security cameras, and let you control or view them from outside the home using Vera's secure network. If you purchased wireless devices from Mi Casa Verde, like wireless security cameras, they were shipped to you pre-configured to work with Vera's wireless network. Just plug them in; there is nothing to configure.

