Create Virtual Switch Manually
From MiOS
(Difference between revisions)
| (3 intermediate revisions by 2 users not shown) | |||
| Line 1: | Line 1: | ||
| + | [[Category:Plugins]] | ||
These instructions are for creating a virtual switch which is compatible with ALL the mobile apps, plus other plugins. | These instructions are for creating a virtual switch which is compatible with ALL the mobile apps, plus other plugins. | ||
== UI4 == | == UI4 == | ||
| − | # Download the attached [[I_VirtualSwitch. | + | # Download the attached [[media:I_VirtualSwitch.zip|I_VirtualSwitch.zip]] file and extract it on your computer. |
# In the '''Toolbox''' section, open '''MiOS(Vera) Developers''', then open the '''Luup files''' tab. | # In the '''Toolbox''' section, open '''MiOS(Vera) Developers''', then open the '''Luup files''' tab. | ||
#:[[File:ui4_vera_developers.png|MiOS(Vera) Developers]] | #:[[File:ui4_vera_developers.png|MiOS(Vera) Developers]] | ||
| Line 20: | Line 21: | ||
== UI5 == | == UI5 == | ||
| − | # Download the attached [[I_VirtualSwitch. | + | # Download the attached [[media:I_VirtualSwitch.zip|I_VirtualSwitch.zip]] file and extract it on your computer. |
# Navigate to '''Apps''' >> '''Develop Apps''' >> '''Luup files'''. | # Navigate to '''Apps''' >> '''Develop Apps''' >> '''Luup files'''. | ||
#:[[File:ui5_luup_files.png|Luup files]] | #:[[File:ui5_luup_files.png|Luup files]] | ||
Latest revision as of 03:04, 15 June 2013
These instructions are for creating a virtual switch which is compatible with ALL the mobile apps, plus other plugins.
[edit] UI4
- Download the attached I_VirtualSwitch.zip file and extract it on your computer.
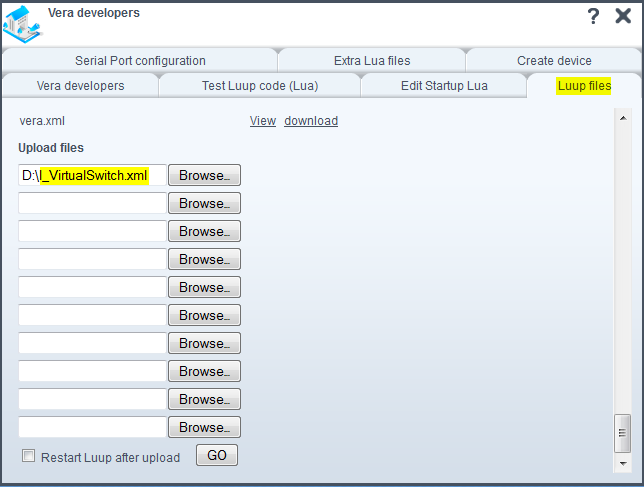
- In the Toolbox section, open MiOS(Vera) Developers, then open the Luup files tab.
- Upload the I_VirtualSwitch.xml file.
- Click GO.
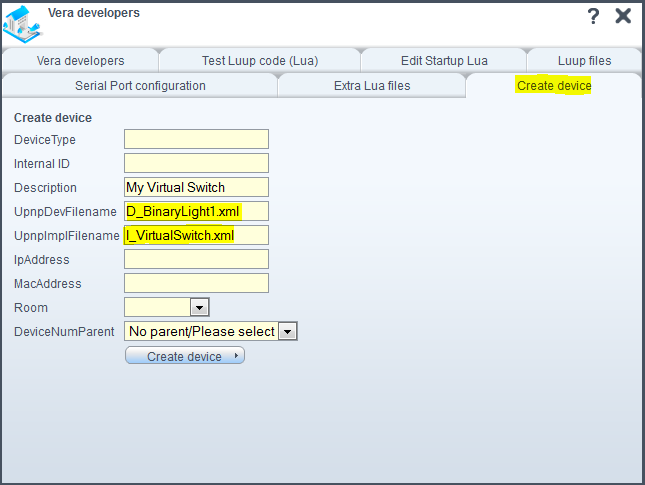
- Open the Create device tab.
- Fill in the UpnpDevFilename and UpnpImplFilename fields like in the picture.
- Enter a name for the switch in the Description field.
- Click Create device.
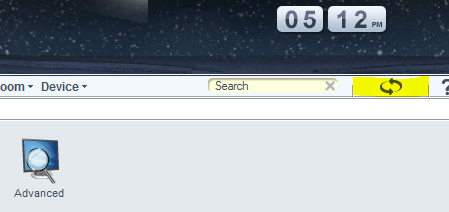
- Reload the Luup engine: press the button with the curved arrows like in the picture.
- Refresh the UI: press Ctrl + F5.
[edit] UI5
- Download the attached I_VirtualSwitch.zip file and extract it on your computer.
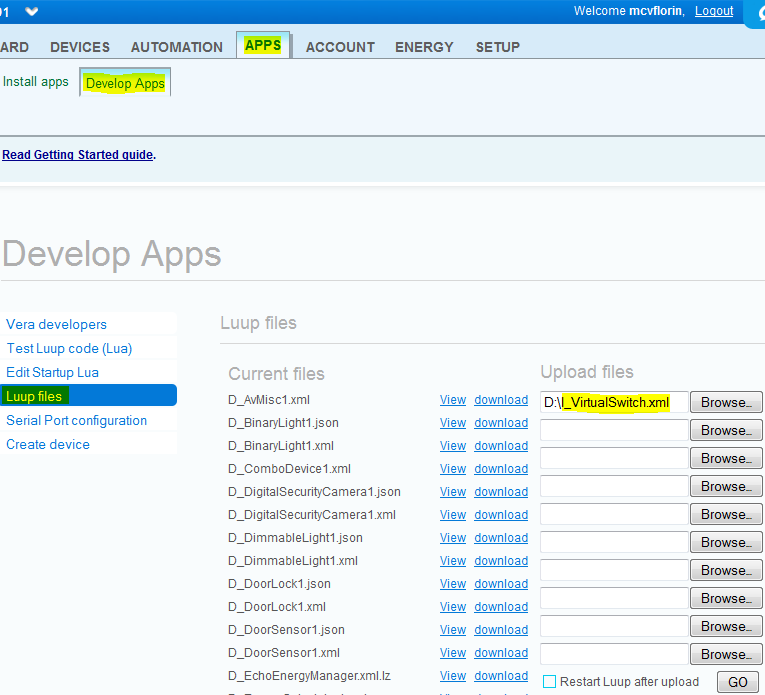
- Navigate to Apps >> Develop Apps >> Luup files.
- Upload the I_VirtualSwitch.xml file.
- Click GO.
- Open the Create device page.
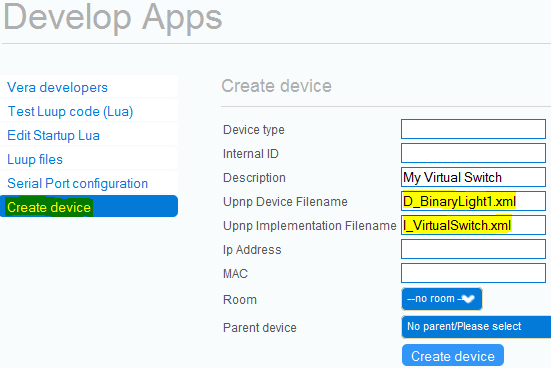
- Fill in the Upnp Device Filename and Upnp Implementation Filename fields like in the picture.
- Enter a name for the switch in the Description field.
- Click Create device.
- Reload the Luup engine: press the blue Reload button like in the picture.
- Refresh the UI: press Ctrl + F5.

